NOSAM7A modular toolbox system by 7MASON

3D printable / Kickstarter pre-launch

The toolbox that becomes your pegboard.

Pack it. Unfold it. Make it yours. An adaptable toolbox, fixed board and complete family of holders — ready to print at home.

Explore the system
100% printable parts+PETG / support-free design+250 × 250 mm build area+Digital STL collection

01 / ONE CONNECTED WORKSHOP

Pack it. Move it.
Open it. Mount it.

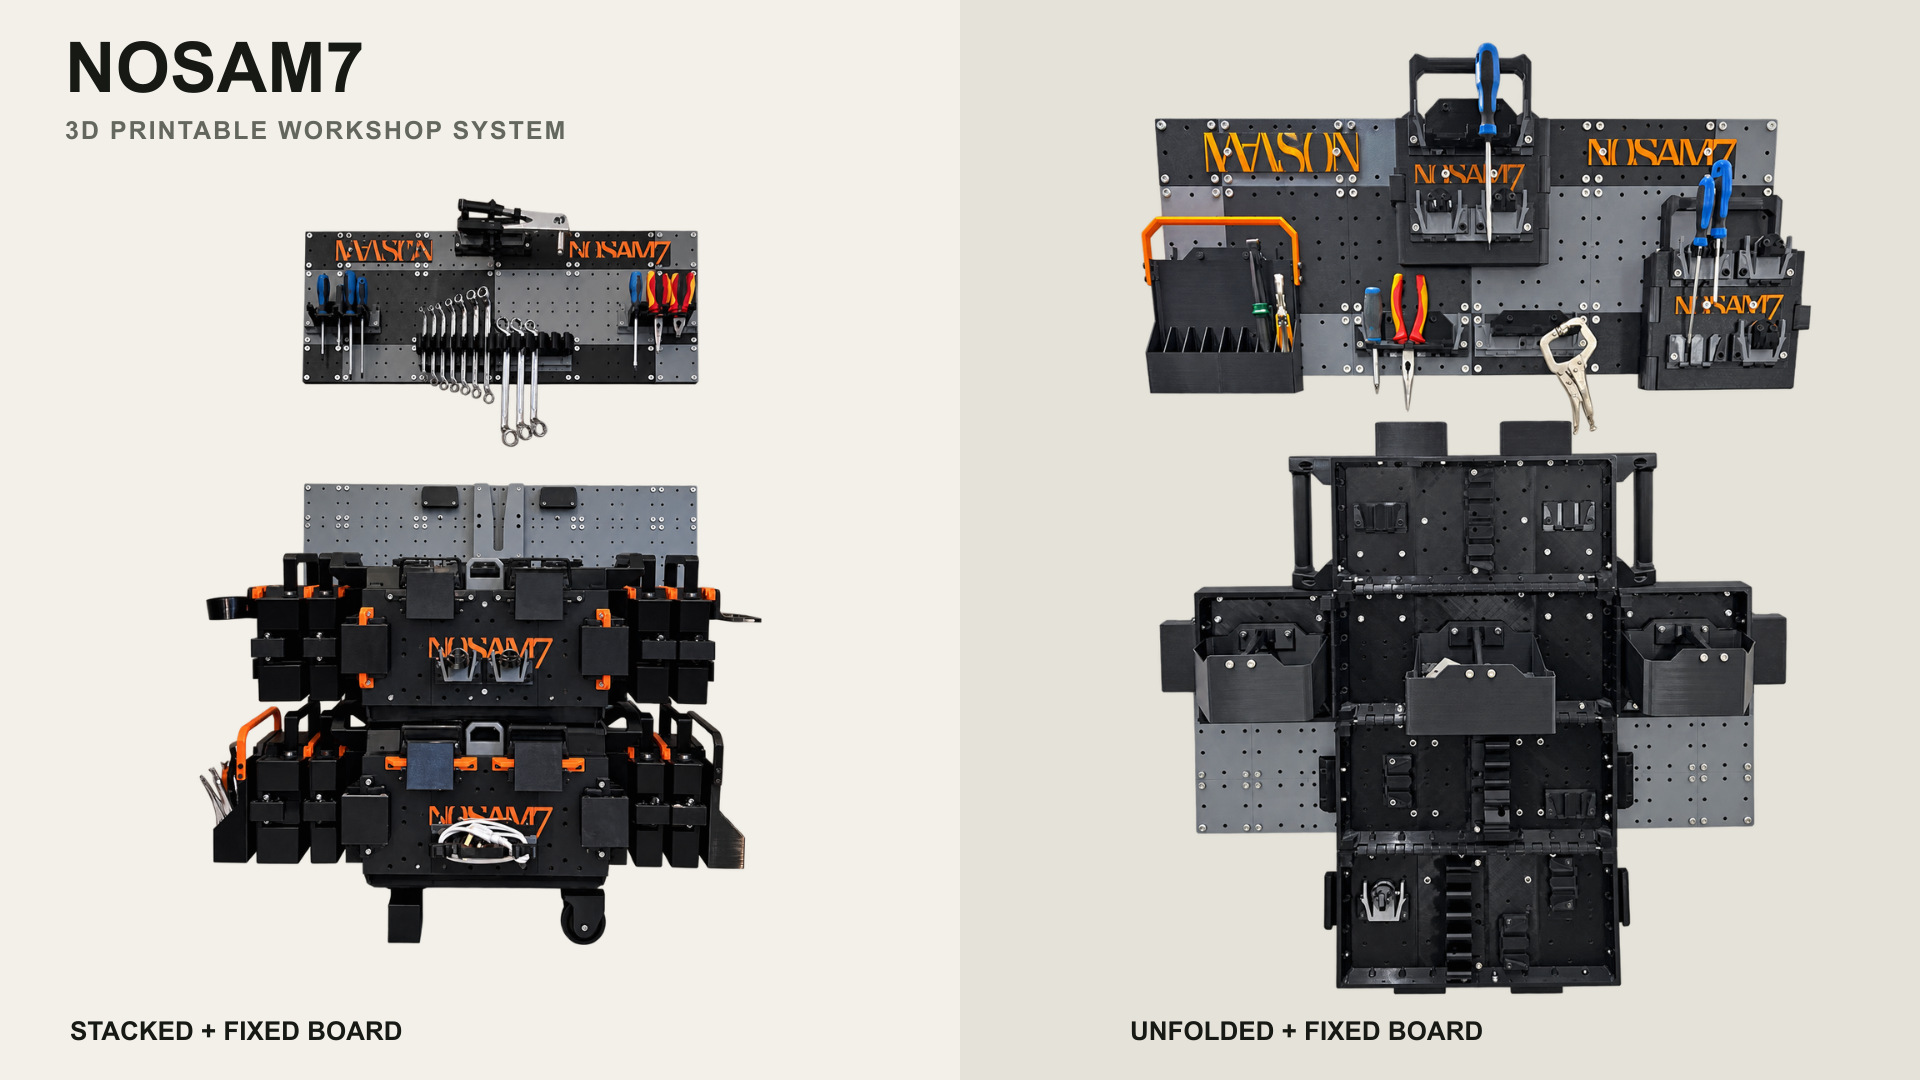
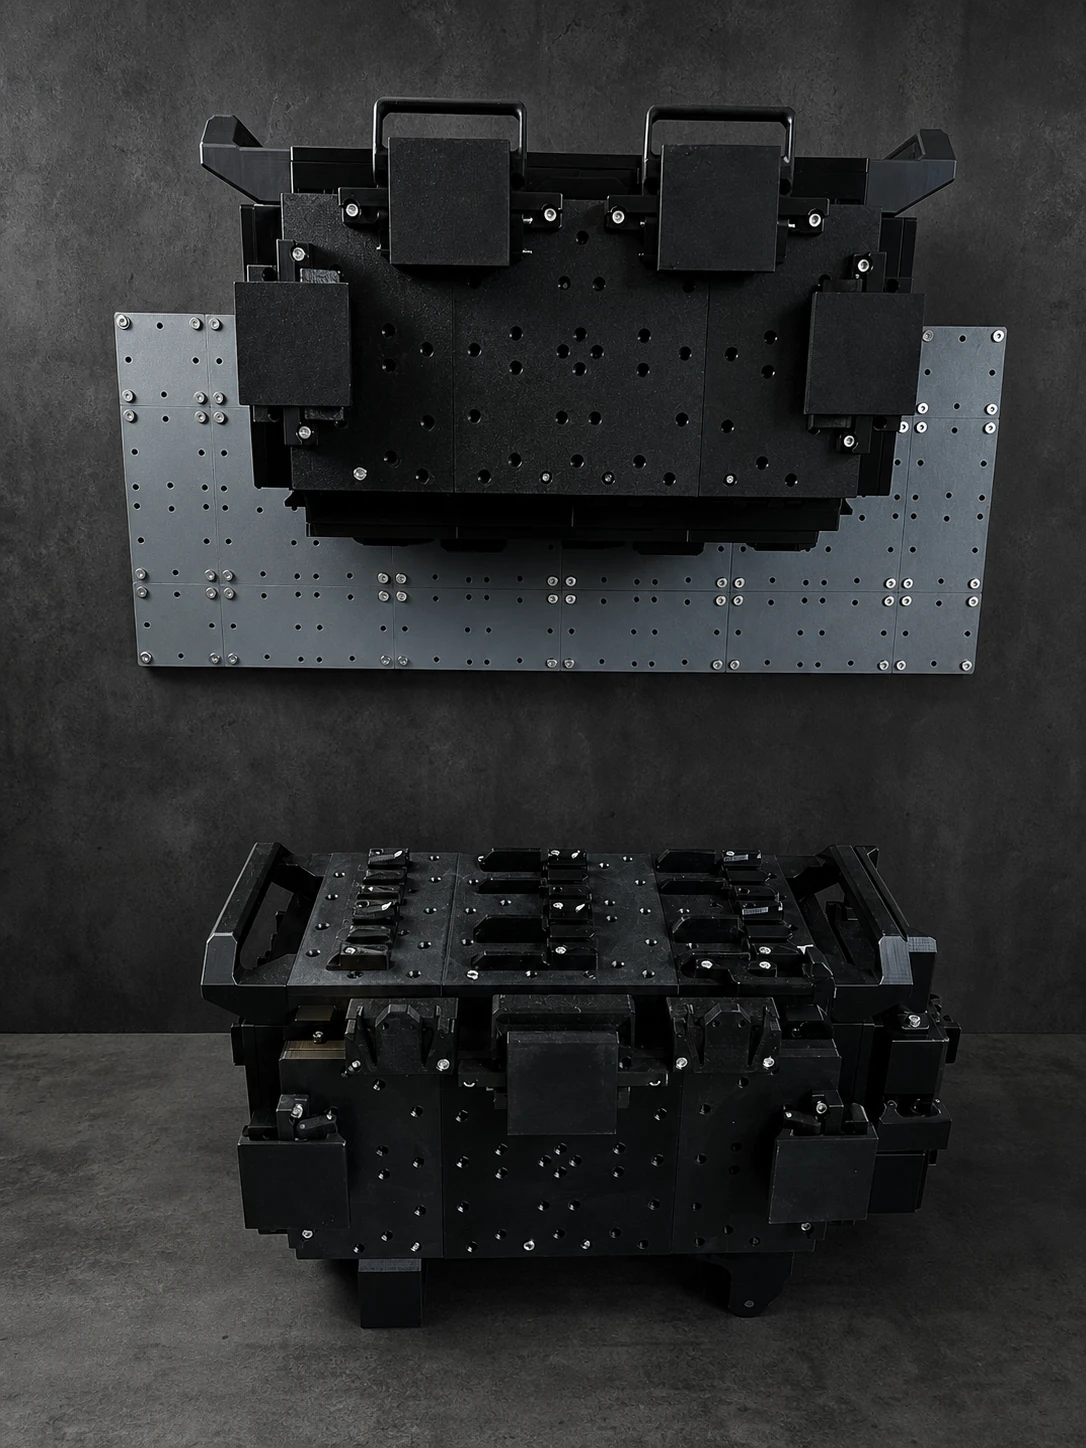
A stacked setup with the fixed board. The same system, unfolded and ready to work.

Left: two stacked NOSAM7 toolboxes with a separate loaded fixed pegboard. Right: unfolded toolbox with a fixed pegboard above.

01 / The idea

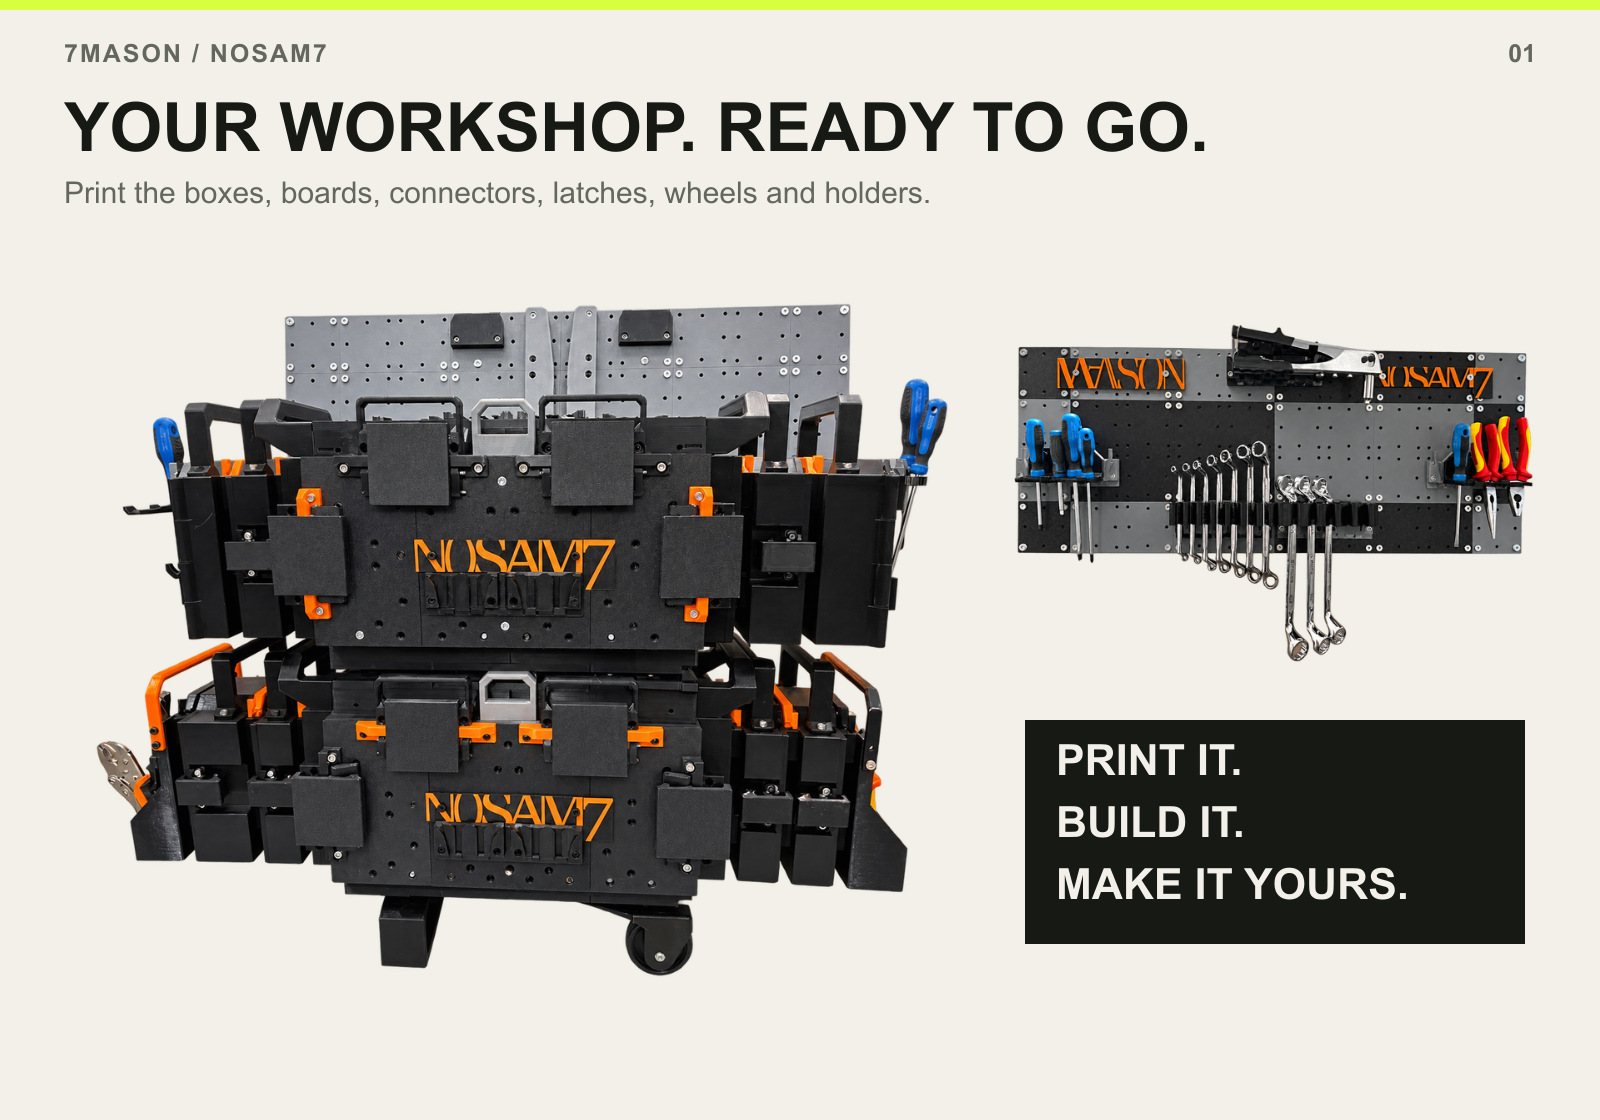
YOUR WORKSHOP.READY TO GO.

A printable stacked NOSAM7 toolbox system beside a fixed pegboard with tool holders; boxes, boards, connectors, latches and wheels are printable.

A toolbox should do more than carry a pile of tools. NOSAM7 is a 3D-printable workshop system built around a toolbox that opens out into a pegboard, with matching fixed boards, storage and holders.

Start with the parts you need. Print them in PETG, assemble your setup, and arrange the holders around the way you work. Add another box, change a tray or move a module between the toolbox and the fixed board.

Print the toolbox panels, fixed pegboard, connectors, holders, storage, closure latches, wheels and stand yourself. For the illustrated setup, the only required bought-in assembly hardware is standard M6 nuts and bolts, three Ø4 mm metal bars and one Ø10 mm metal bar. You supply the printer and PETG; wall mounting also needs fixings suited to your wall.

You are backing downloadable STL files. The photographs show assembled prototypes and example tools; no physical products are included.

02 / Carry → unfold → organise

ONE BOX.MORE POSSIBILITIES.

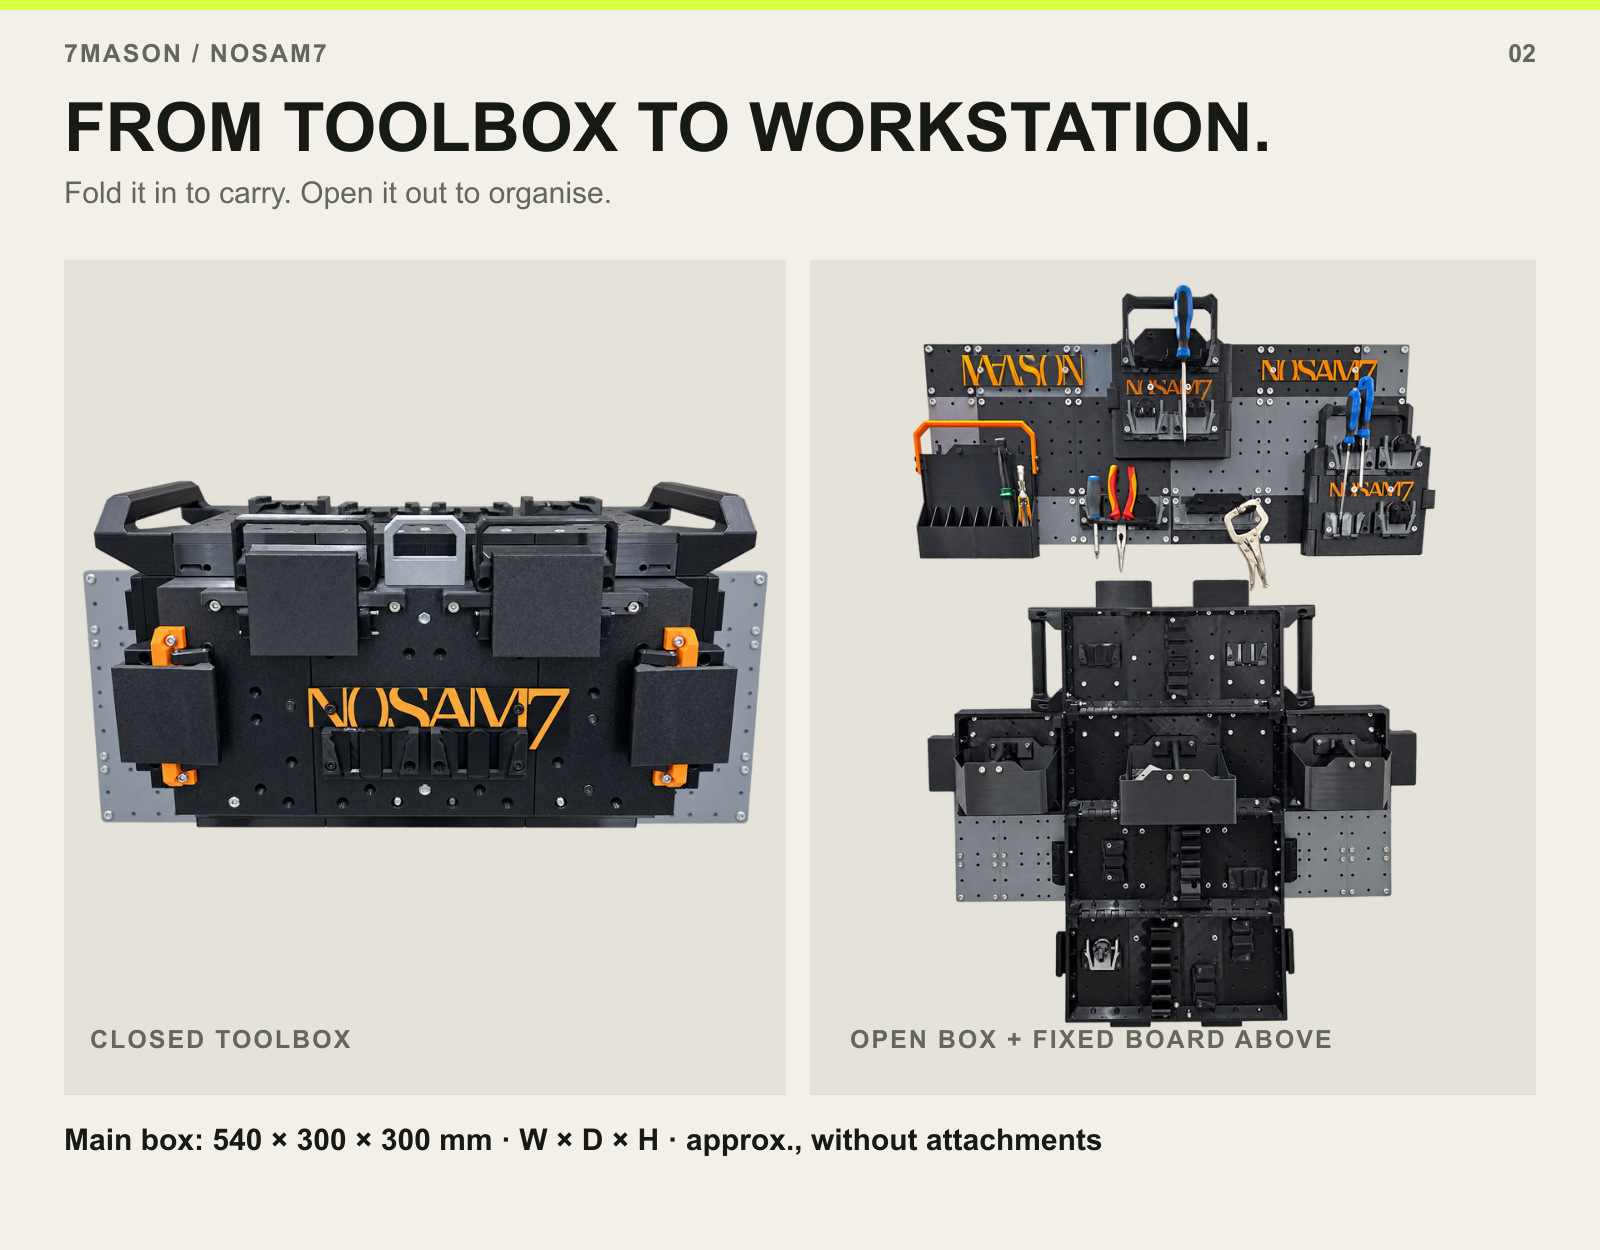
Closed toolbox and unfolded toolbox below a separate fixed pegboard. Main box approximately 540 by 300 by 300 mm.

Fold the panels in to form the toolbox. Open them out to make tools and storage easier to see and reach. The fixed pegboard gives you another home for the same family of modules.

The main box is approximately 540 × 300 × 300 mm, width × depth × height, without attachments. The example stacked setup is approximately 1000 × 350 × 900 mm; its overall size changes with the arrangement and accessories.

01

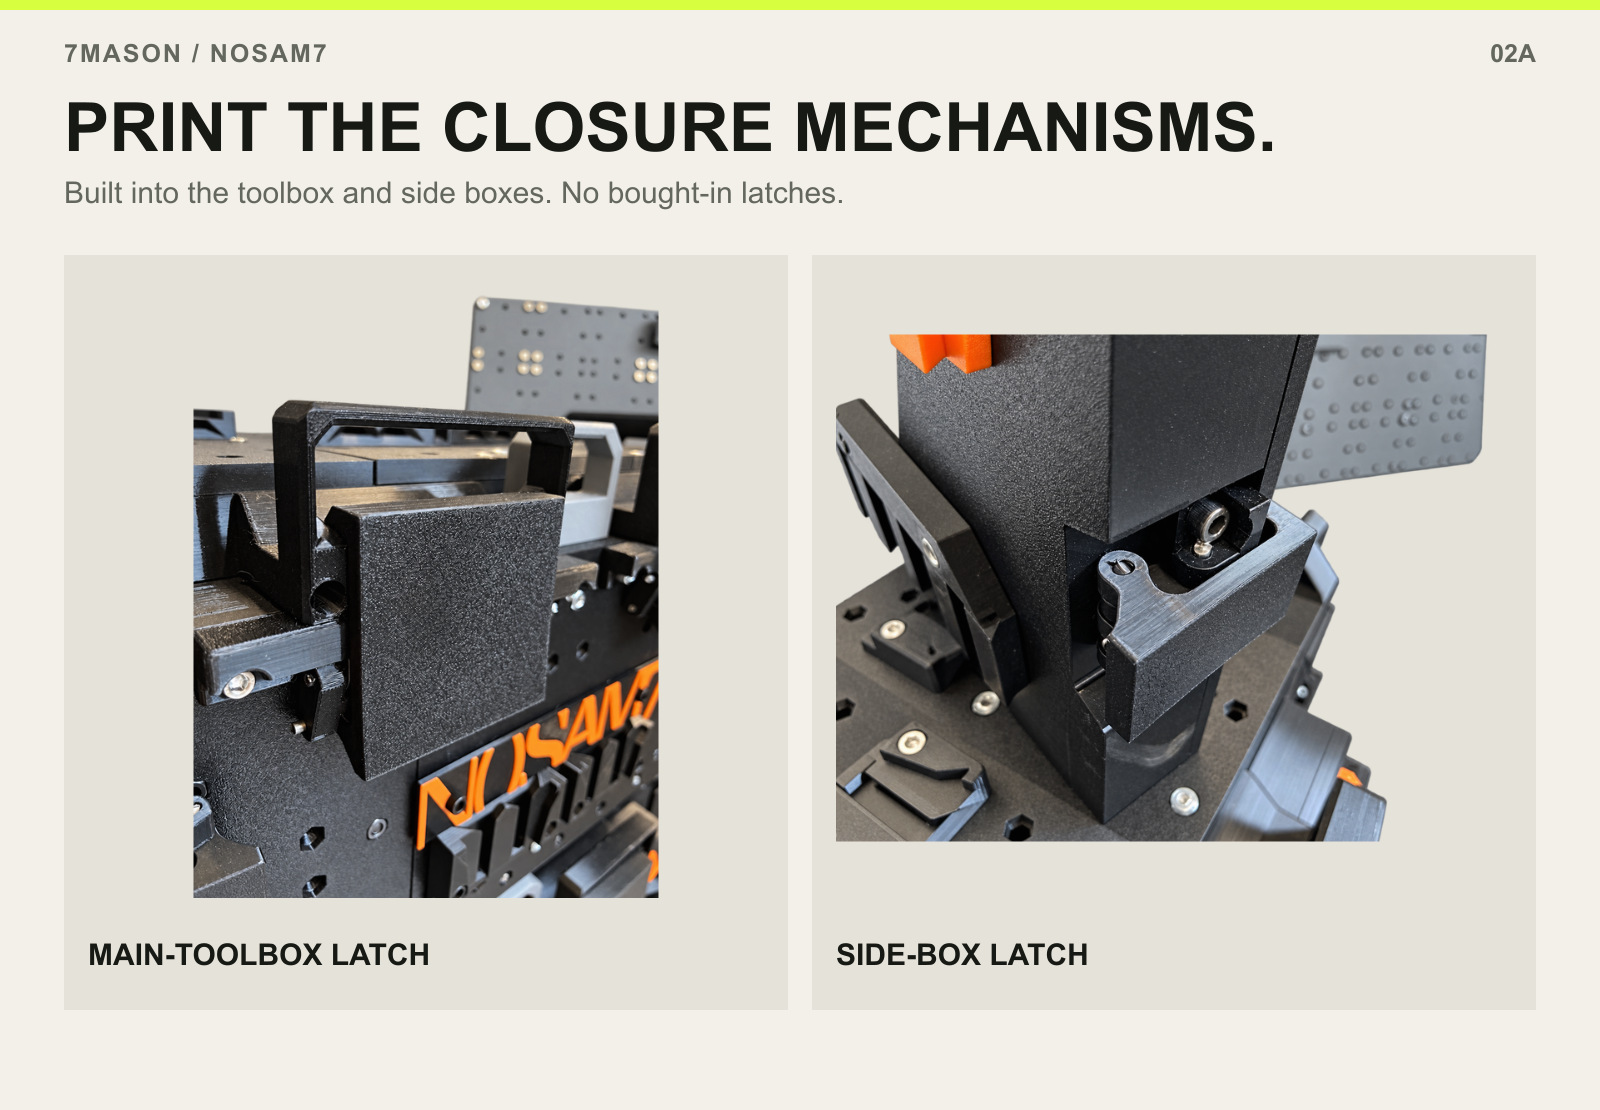
Printable closure mechanisms — toolbox and side boxes

PRINT THE CLOSURE MECHANISMS. — MAIN-TOOLBOX LATCH and SIDE-BOX LATCH.

The main-toolbox latch and separate side-box latch are working parts of the boxes themselves, not add-on accessories. Print these closure mechanisms in PETG along with the rest of the system; there is no need to buy ready-made latches.

Each latch closes its corresponding door or lid. These mechanisms are distinct from the accessory SnapDock connection, the box-to-box StackLock and the rear WallDock.

Check the latch engagement and fastener tightness as part of assembly and before moving the toolbox. Printed fit and wear can vary, so inspect the working parts periodically.

03 / Shared attachment system

ONE INTERFACE.MANY WAYS TO WORK.

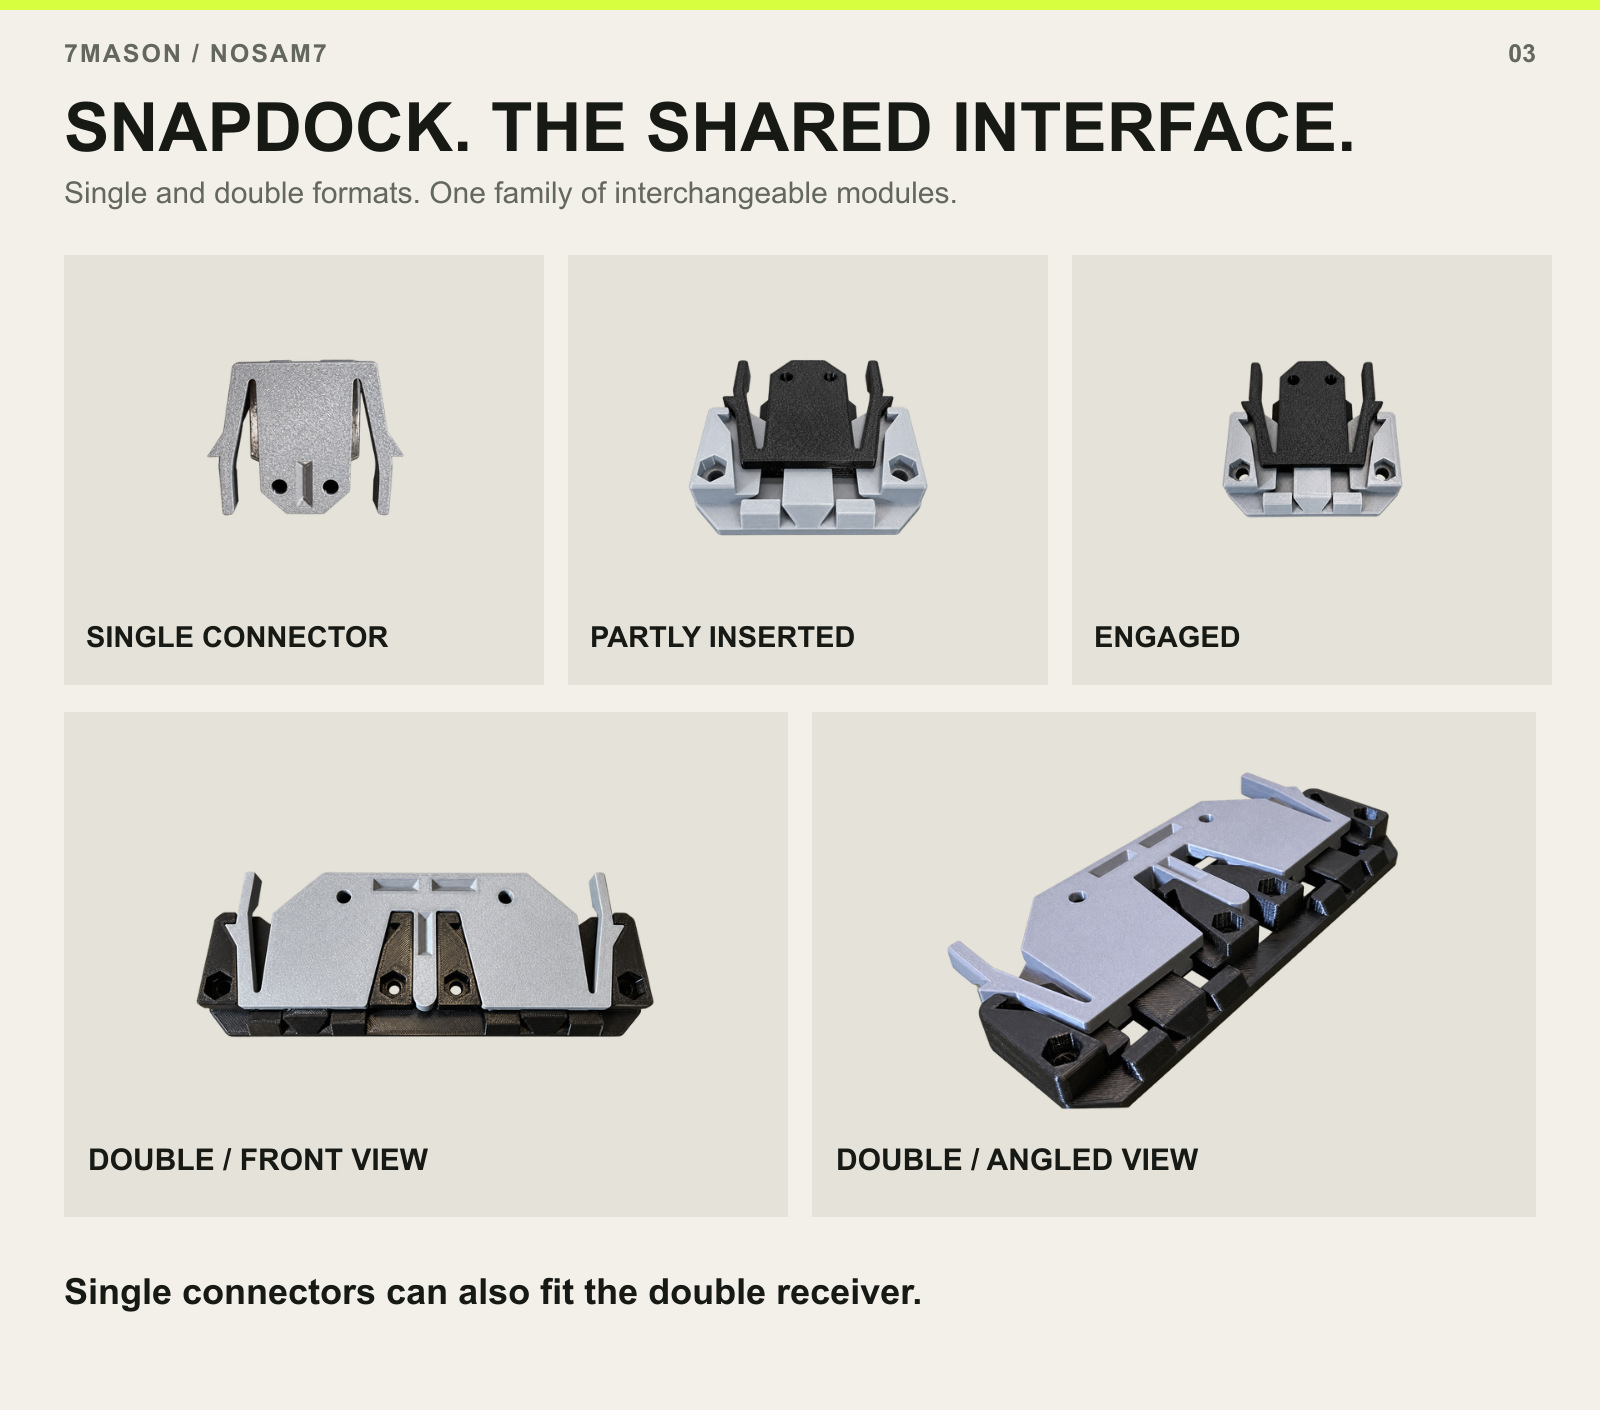
Single SnapDock connector, partly inserted and engaged; double interface shown from the front and at an angle using photos 181 and 167.

SnapDock is the shared attachment interface across the NOSAM7 accessory family. Each compatible holder has a connector that slides into a matching receiver rail and snaps into engagement. The photographs show the single connector on its own, part-way into its receiver and fully engaged, followed by two views of the double interface.

Single and double formats let the same system accommodate different module layouts. A single connector can also fit the double receiver, so you can use smaller holders alongside modules that use the wider attachment. Tool holders, trays, hooks and storage can move between compatible positions on the fixed pegboard and the unfolding toolbox.

The double interface is used by the side boxes, including adjacent and vertically arranged layouts. You can change the accessory arrangement without redesigning the board around each tool. Print fit matters: check that your connector fully engages with its receiver before loading it.

  • SnapDock = modules to toolbox or pegboard.
  • StackLock = one toolbox to another toolbox.
  • WallDock = rear of toolbox to wall-mounted receiver.
SnapDock in action — double connector, then single connector.

03B / The fixed board

One board. Both pods.
Either direction.

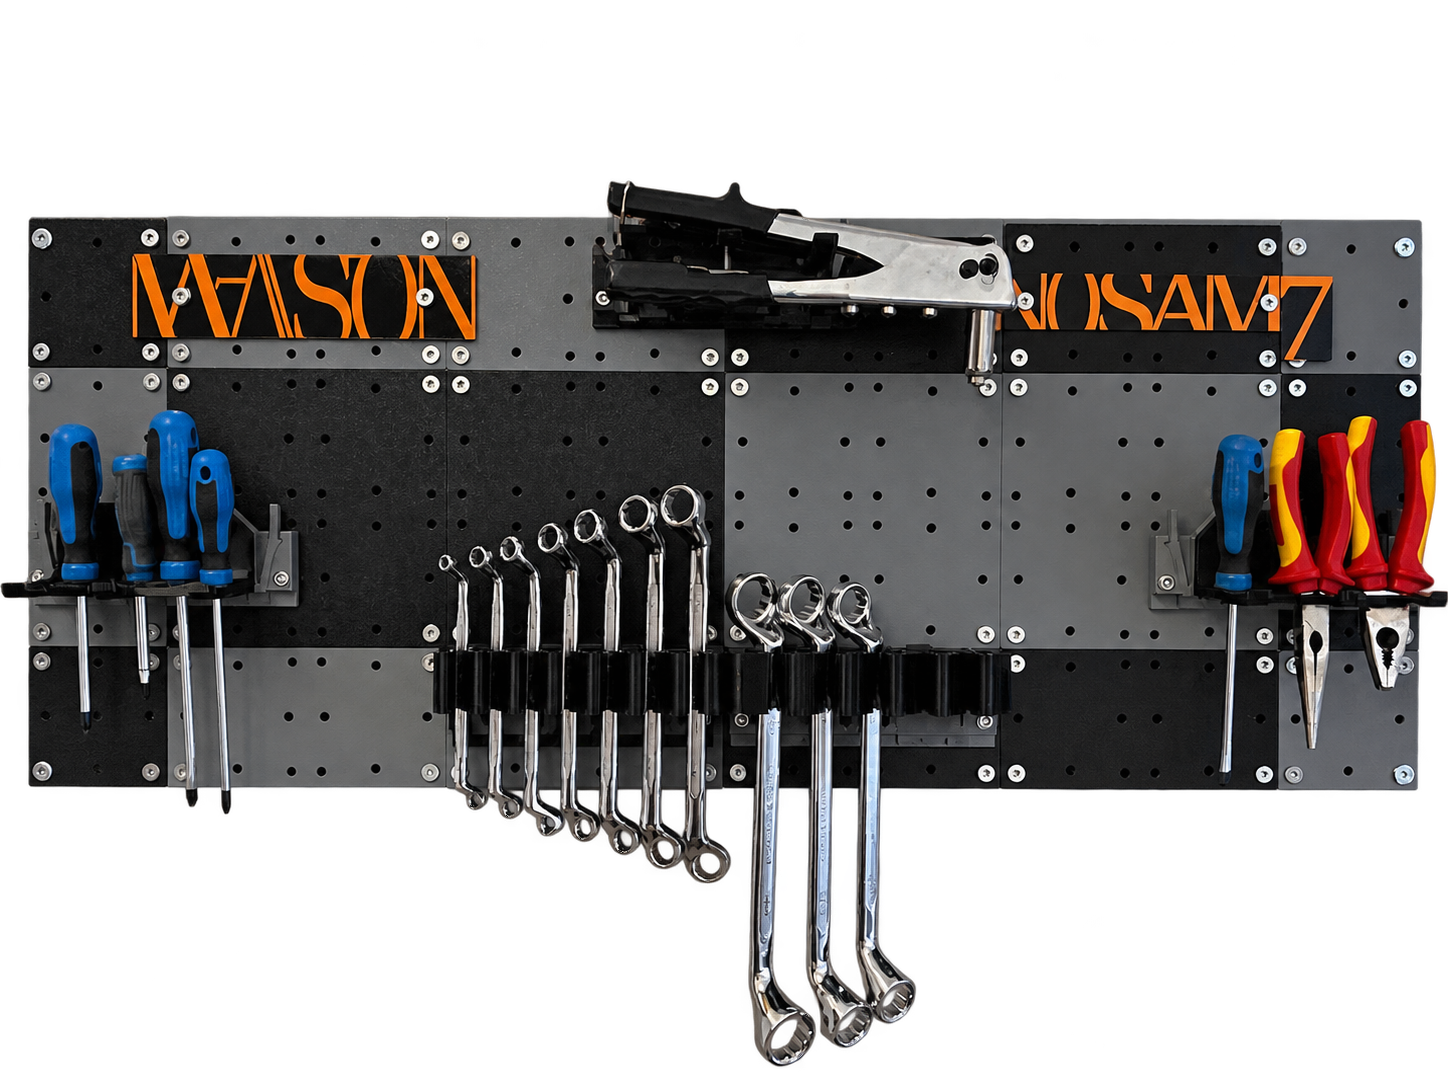
Loaded fixed board with tool trays, spanner racks and compatible holders

The NOSAM7 fixed board is designed to work with both single and double pods in horizontal and vertical orientations. Arrange your holders around the tools you use and the space you have, using the same attachment family as the unfolding toolbox.

The board's two matching plates work together to add rigidity and keep the assembled dimensions consistent. Small printable sections join into a larger board, so you can build a continuous tool-storage surface without fixing every small plate separately to the wall.

Matching plates assemble into a larger, two-layer board.

Assemble the plates into the board first, then mount the completed assembly. For the intended large-board wall configuration, the design uses two wall-fixing points. A four-fixing layout is intended for van installations or where additional anchoring is needed. The bolts joining the printed plates are separate from these wall fixings: two wall holes does not mean only two bolts in the whole board.

Print the board in PETG. Choose suitable fixings for the supporting wall or vehicle structure, and verify the installation for the board size and intended load. Fixing requirements depend on the installation; no rated load or vehicle-safety certification is claimed.

04 / Box-to-box connection

STACK YOUR SETUP.

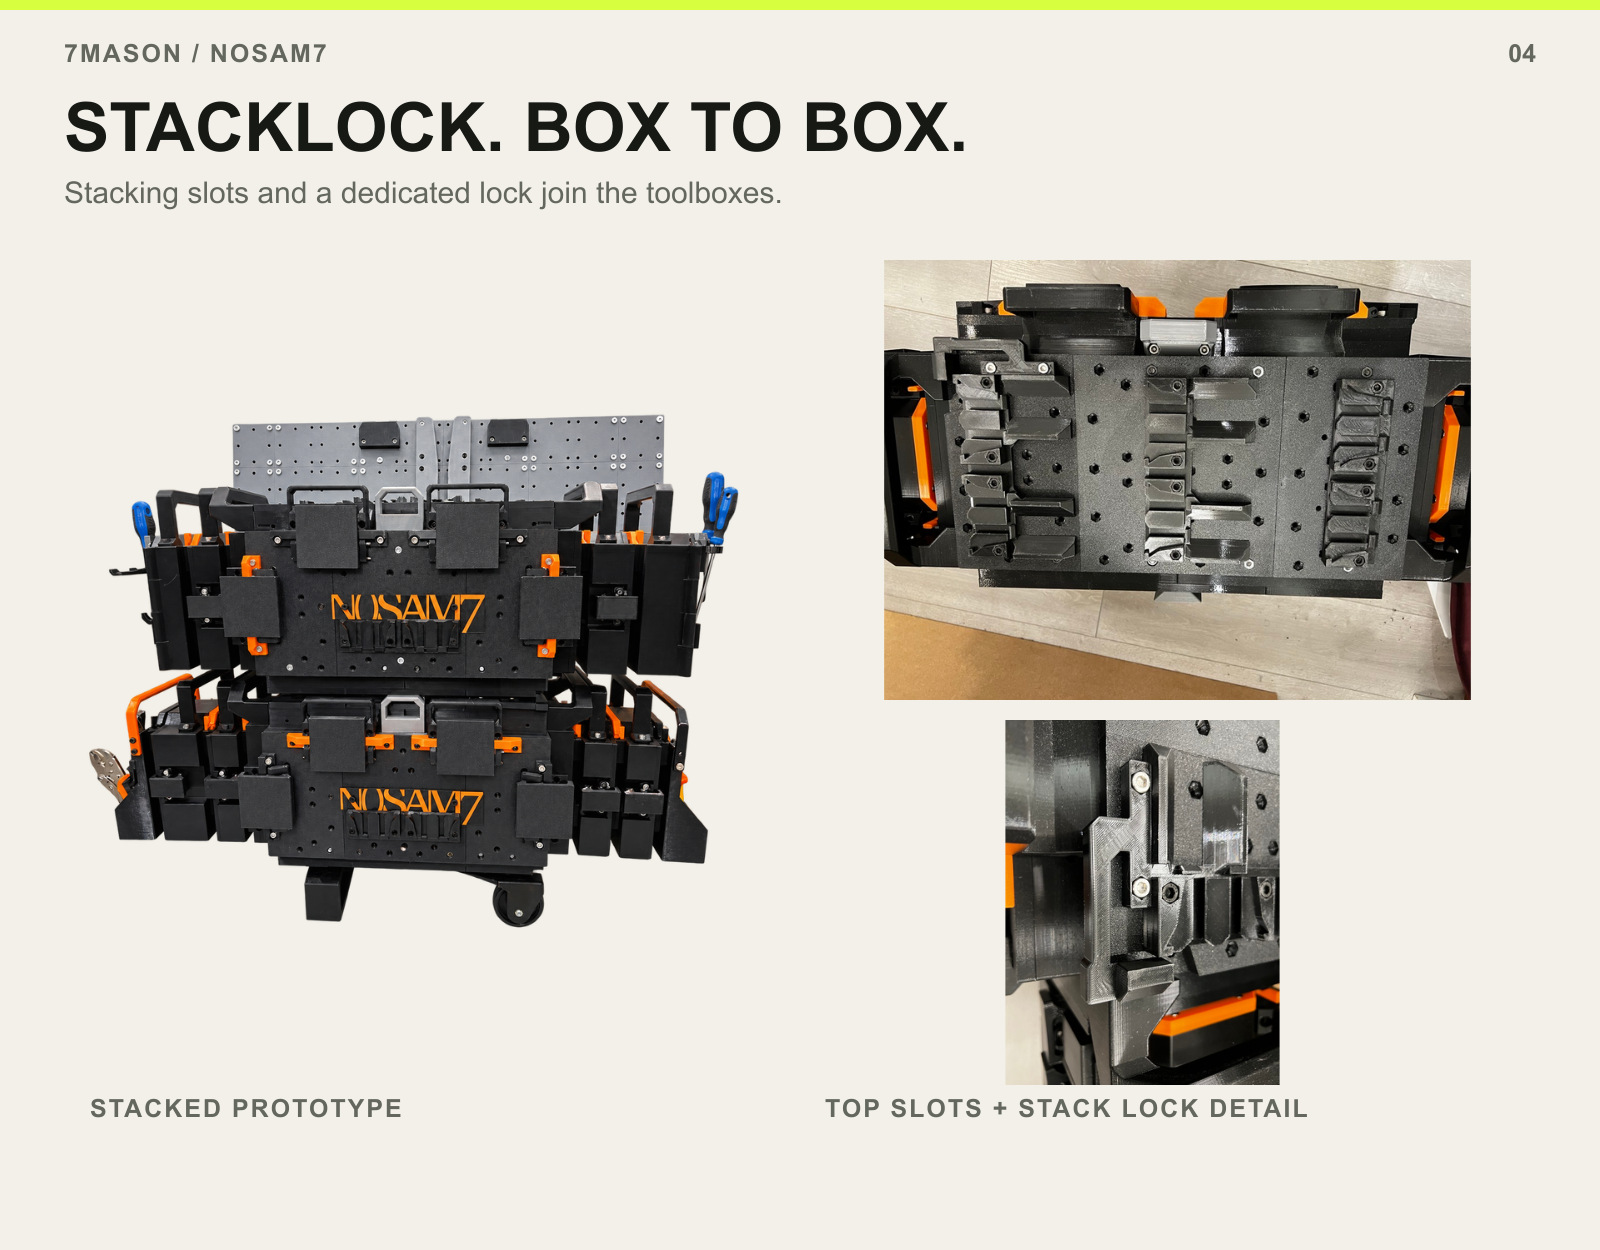
Stacked boxes, top of the lower box with stacking slots, and the stacking lock close-up.

NOSAM7 toolboxes can stack together using the slots on top of the lower box and the dedicated stacking lock. Each toolbox can also open out into its pegboard configuration.

The close-up here shows StackLock, the box-to-box mechanism. It is separate from the wall-mount connection shown next. Load limits have not yet been established; do not treat the photographs as a rated-load test.

05 / Toolbox-to-wall connection

GIVE THE BOXA PLACE ON THE WALL.

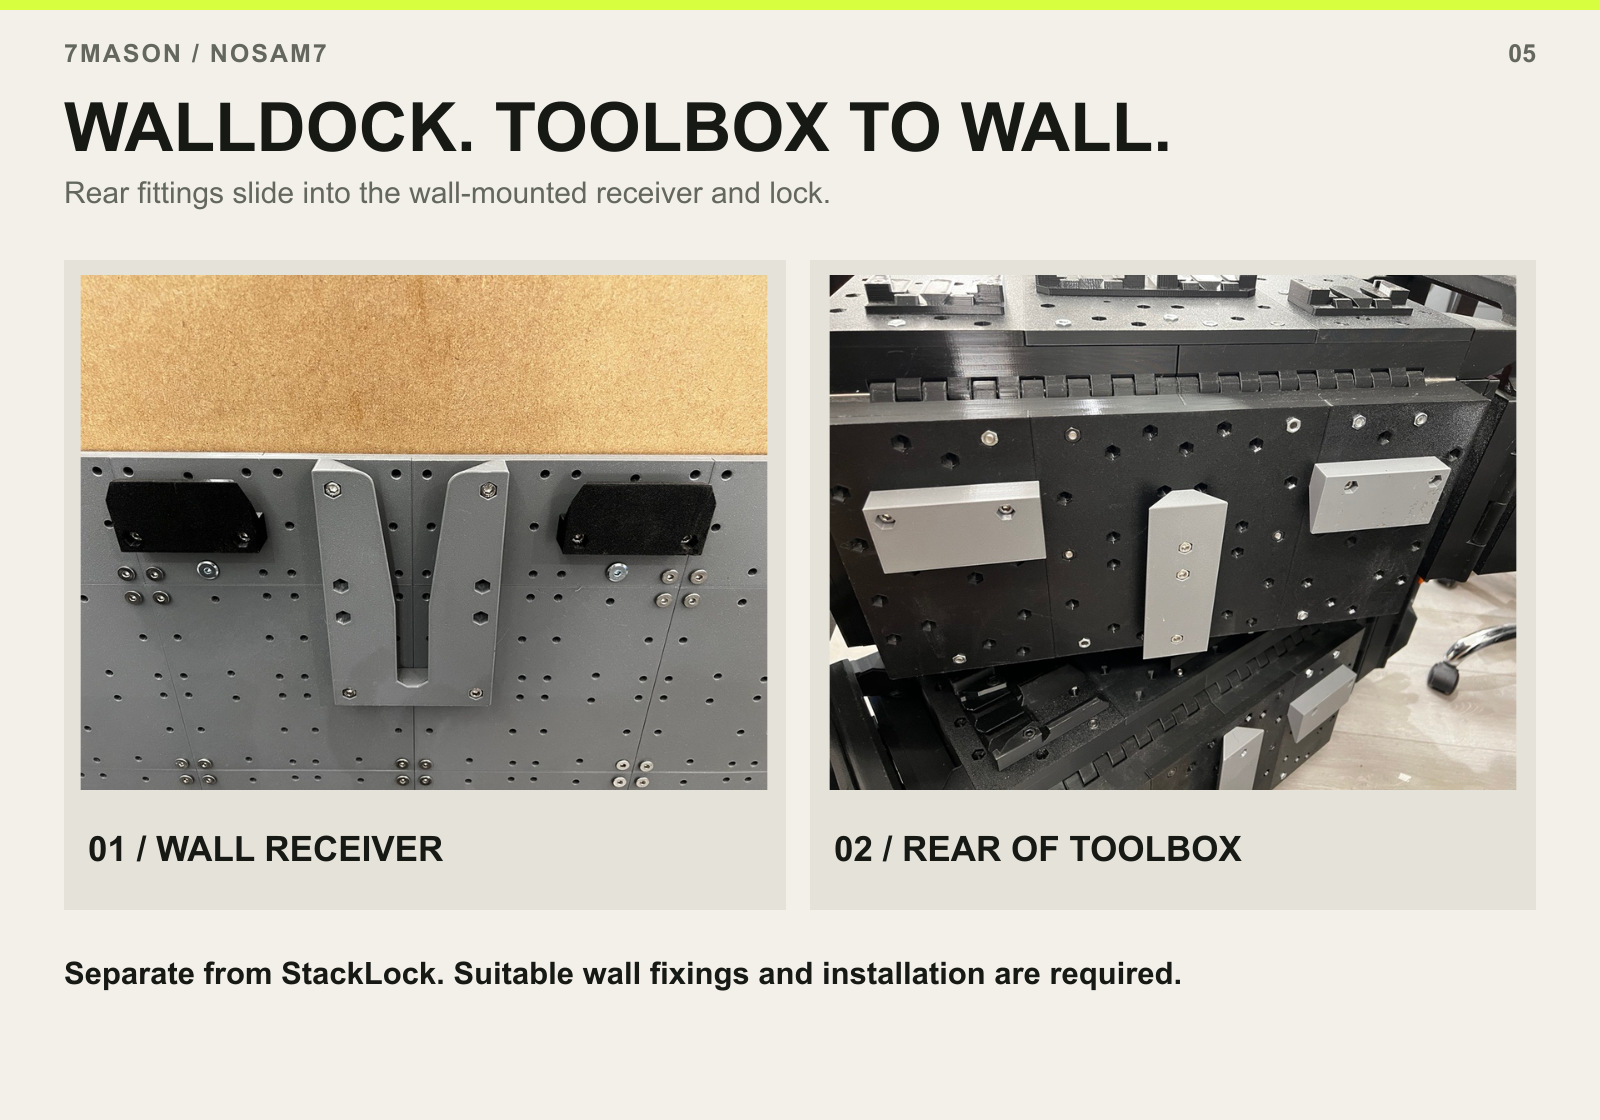
Wall receiver on the left and matching rear fittings on the toolbox on the right; original photographs.

The mating parts on the rear of the toolbox slide into the wall-mounted receiver and lock into position. WallDock brings the box into your workspace without changing the accessory interface.

Use suitable fixings for your wall construction and verify the installation before loading. No rated wall-mounted capacity is claimed. Wall fixings and mounting hardware are not supplied.

06 / Removable mobility

WHEELS WHEN YOU WANT.A STAND WHEN YOU NEED.

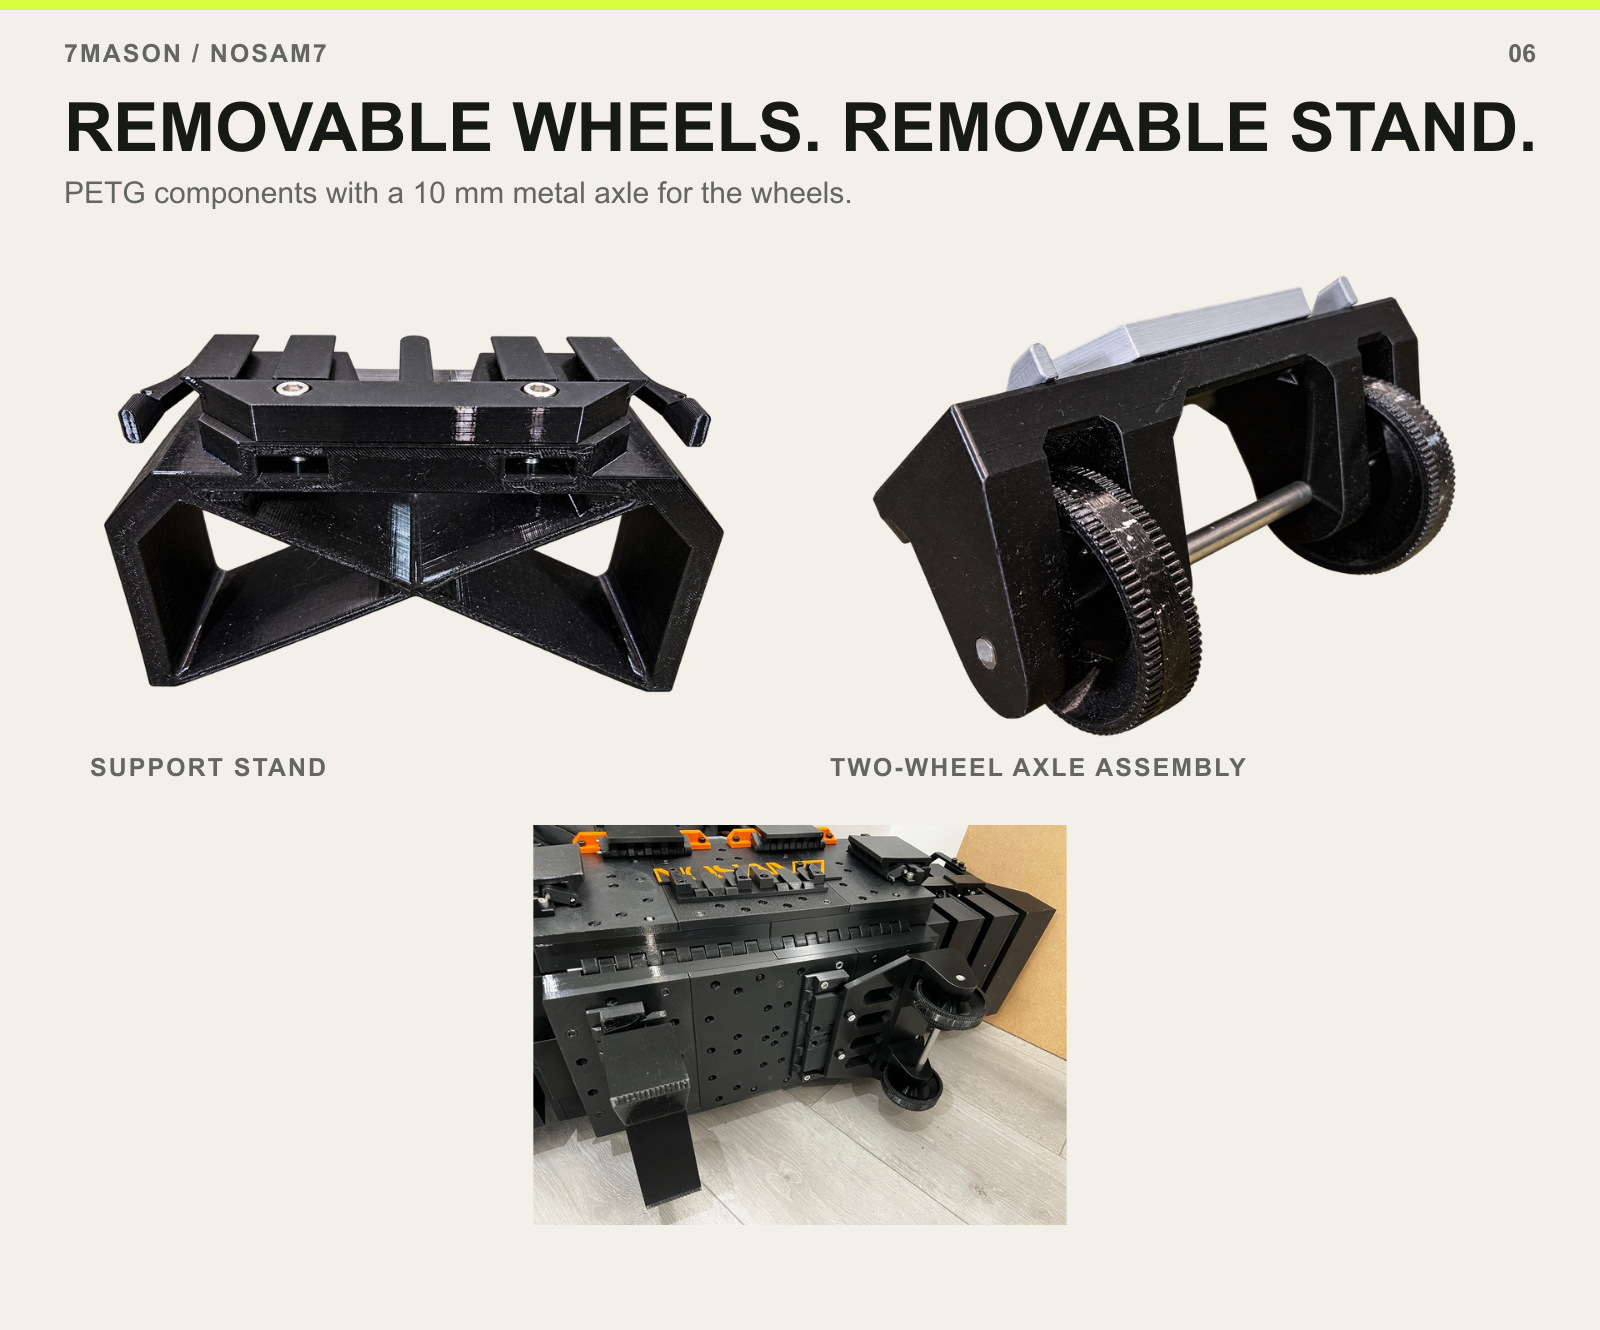
Separate removable support stand and wheel axle assembly, with original installed underside view.

A removable two-wheel assembly and removable support stand attach underneath the bottom toolbox. The wheels use a 10 mm metal axle; the printed wheels, mounts and stand are PETG parts.

The photographs show the separate components and their installed positions. Remove or refit these modules to suit the setup. They are included in the core STL collection, not reserved for a stretch goal.

02 / THE COMPLETE COLLECTION

A place for everything.
Built around your tools.

Racks, five tray layouts, side boxes, pocket bins and everyday holders. All included in the core STL collection.

07 / Tool-specific organisation

EVERY TOOLHAS ITS PLACE.

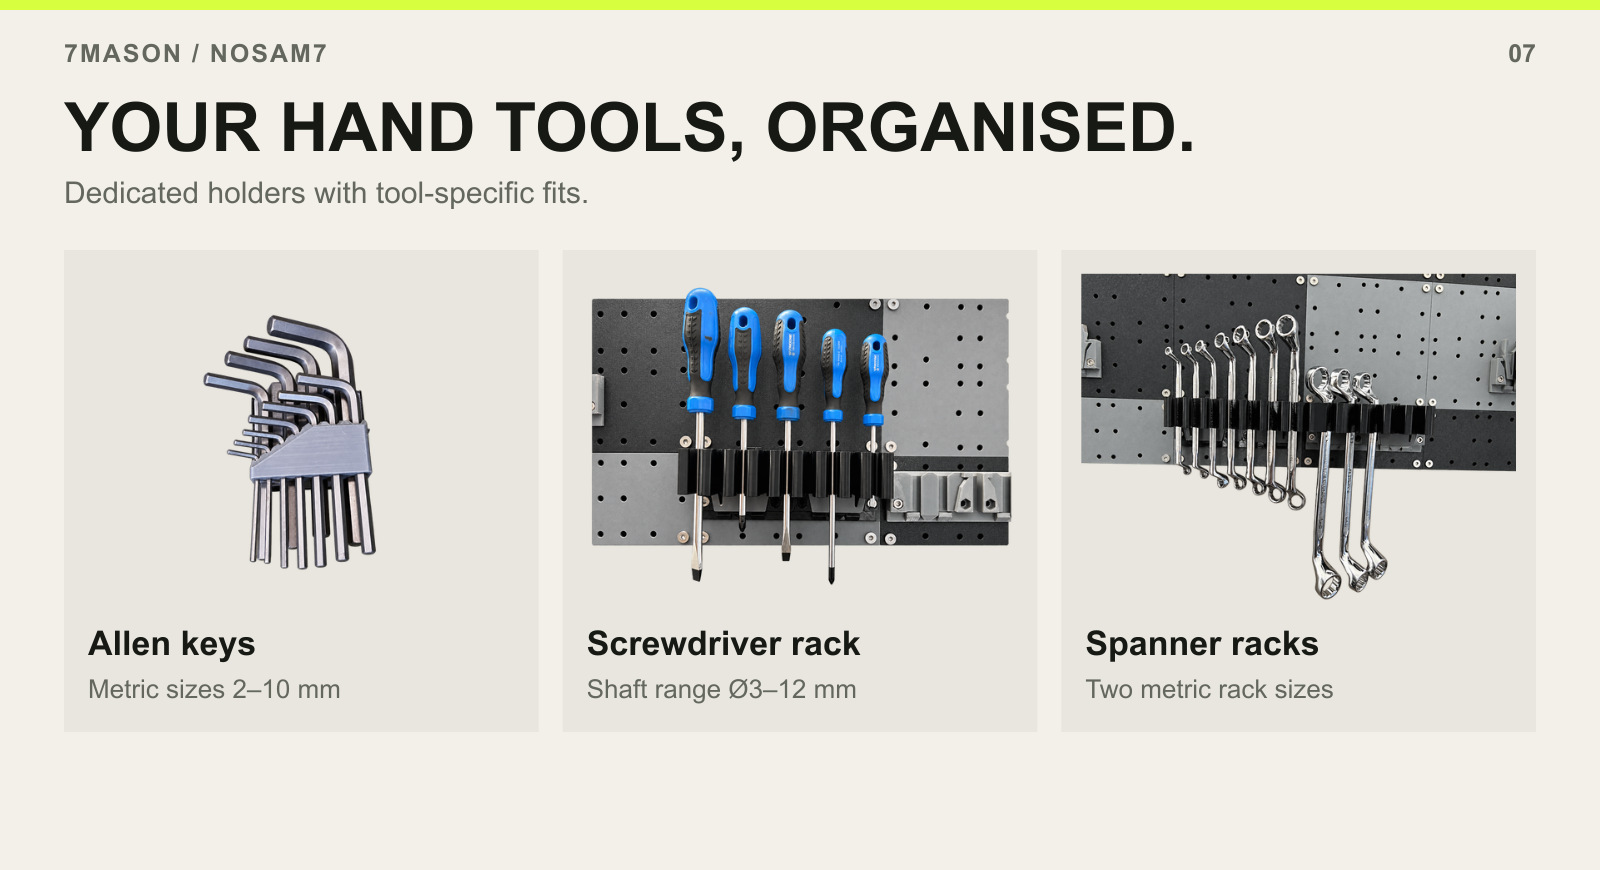
YOUR HAND TOOLS, ORGANISED. — Allen keys, Screwdriver rack, Spanner racks

The tool-specific racks keep a set together while giving each tool its own position. All use the shared attachment system, so the same holder can be part of the fixed board or the toolbox layout. Choose the holder by the tool dimensions below, not just the appearance of its handle.

01

Allen-key holder

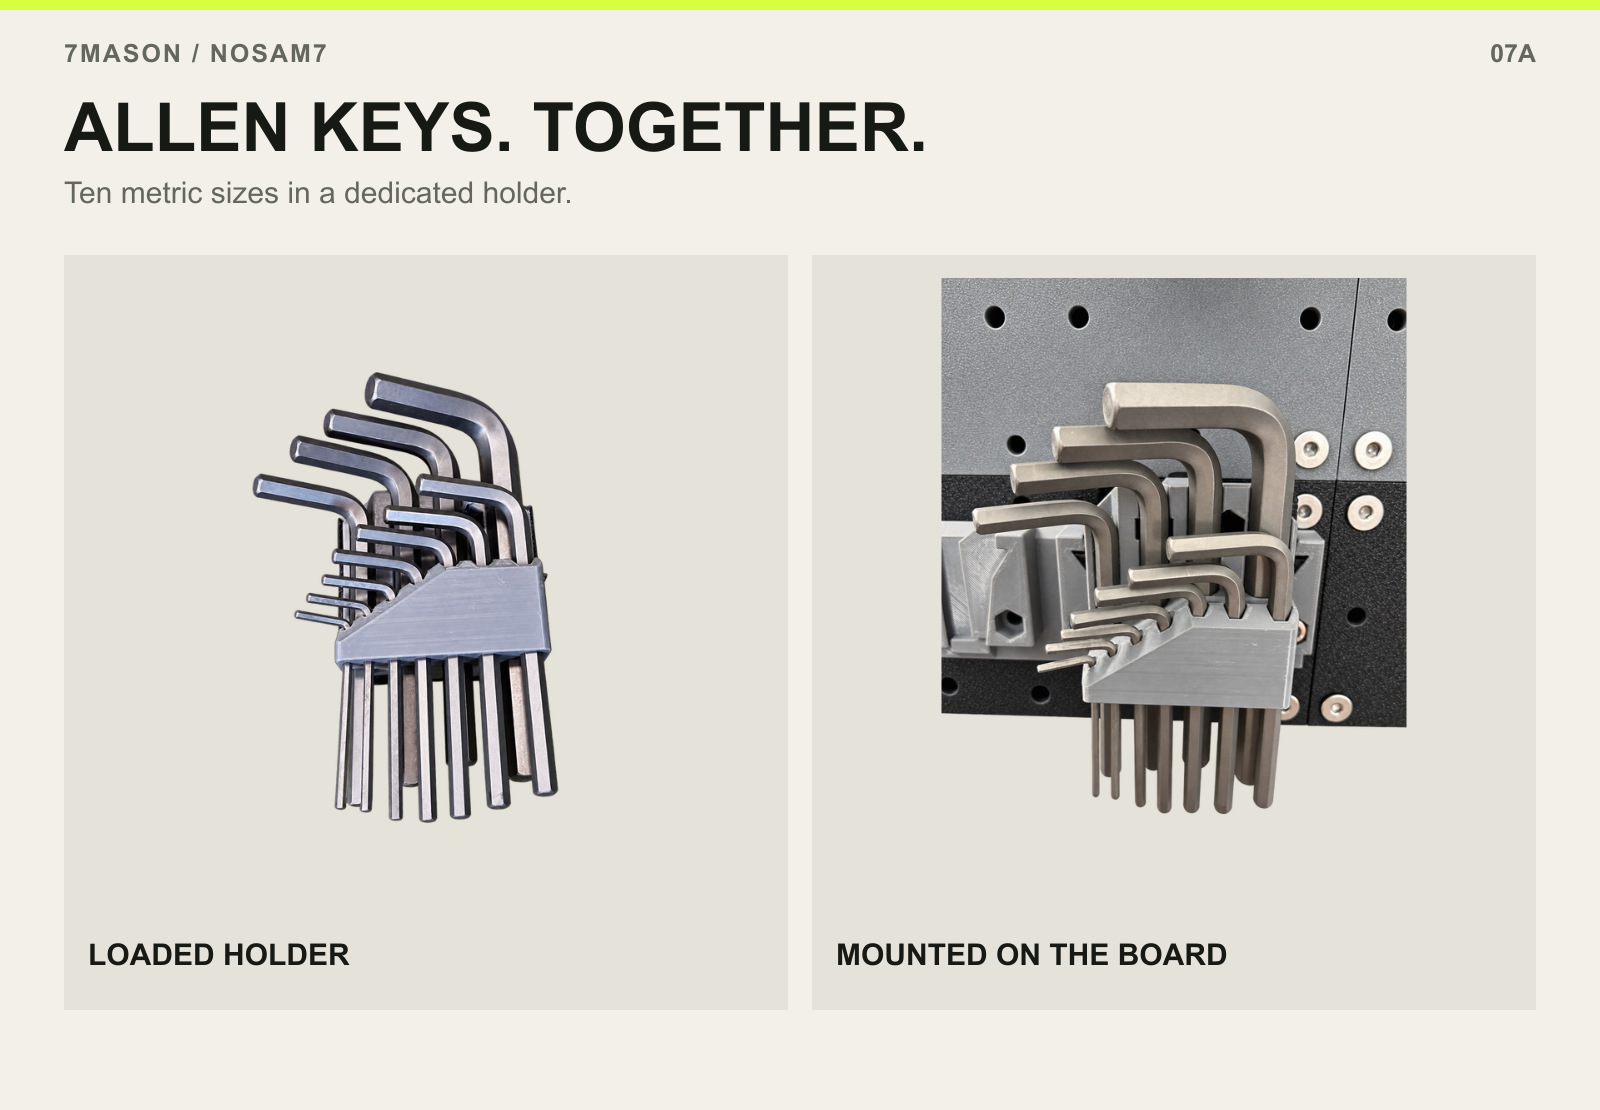
ALLEN KEYS. TOGETHER. — LOADED HOLDER and MOUNTED ON THE BOARD.

Keep ten metric Allen-key sizes in one compact holder: 2, 2.5, 3, 4, 4.5, 5.5, 6, 7, 8 and 10 mm. The dedicated positions separate the keys, making it easier to find a size and see what is missing. The two views show the loaded holder on its own and fitted to the board.

This is the standalone Allen-key module. Its size list differs from the Allen-key positions on Tray 1, which are listed separately below. Check the form of your keys and the printed fit before filling the holder.

02

Snap-retaining screwdriver rack

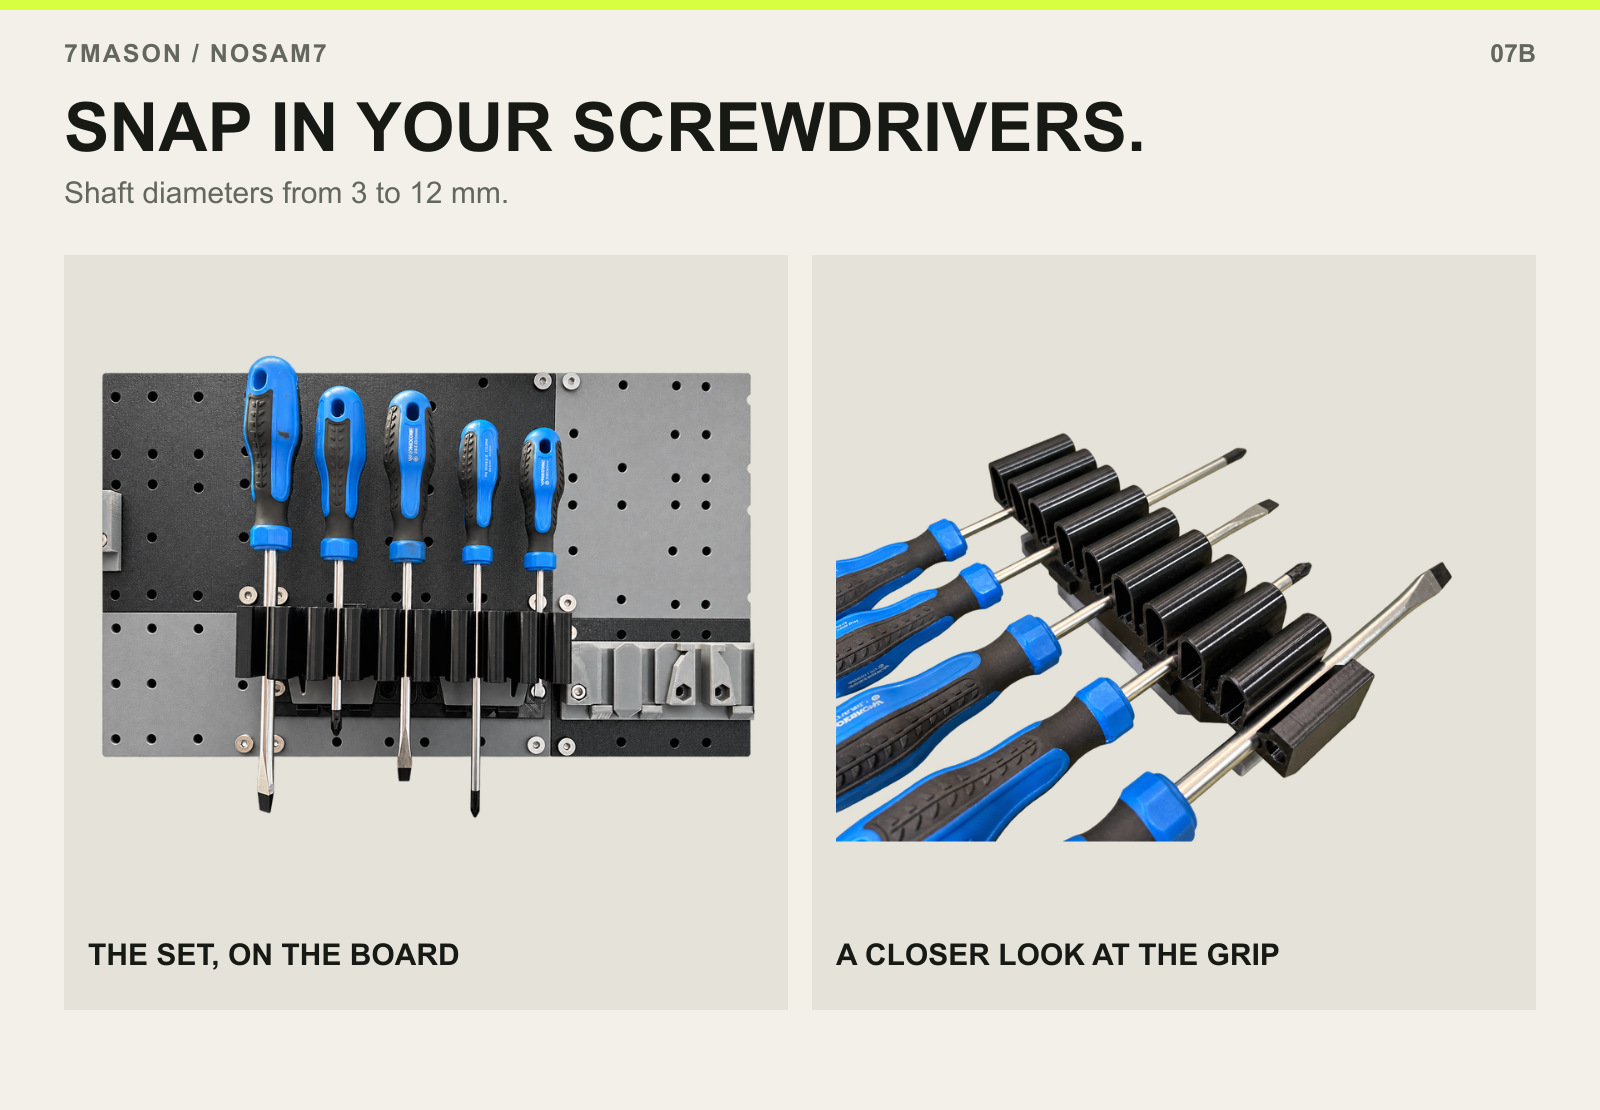
SNAP IN YOUR SCREWDRIVERS. — THE SET, ON THE BOARD and A CLOSER LOOK AT THE GRIP.

The screwdriver rack accommodates shaft diameters from 3 to 12 mm. Each screwdriver presses into a shaped retaining position; the snap-lock design grips the shaft rather than relying only on the handle resting in an open hole. The front view shows the set mounted on the board, while the angled view shows the shaft engagement.

Use the position that matches the shaft, and check the engagement with your own tools. The retention is intended to help keep the set organised when moving the toolbox, but no transport-retention test or guarantee for every screwdriver profile is claimed.

03

Two metric spanner racks

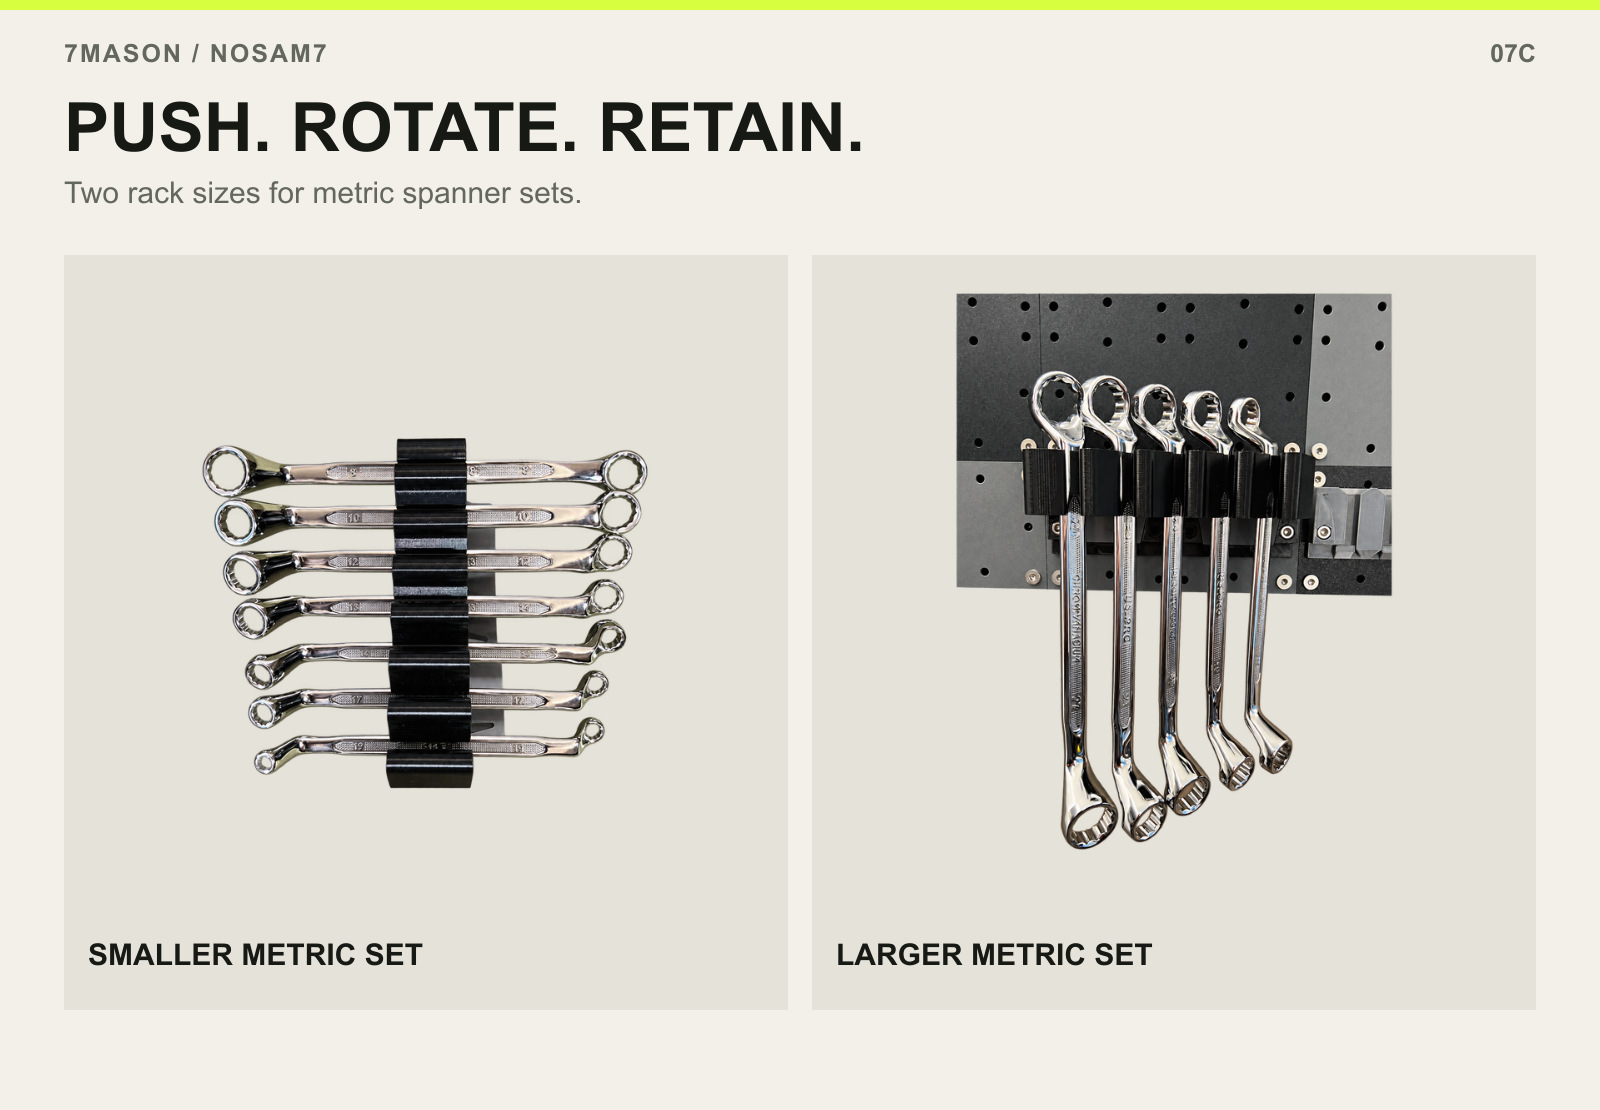
PUSH. ROTATE. RETAIN. — SMALLER METRIC SET and LARGER METRIC SET.

The smaller rack is designed for seven paired metric sizes: 6–7, 8–9, 10–11, 12–13, 14–15, 16–17 and 18–19 mm. The larger rack covers five pairs: 16–17, 18–19, 20–22, 21–23 and 24–27 mm. The overlapping sizes let you choose the rack that suits the set you use.

To retain a compatible spanner, push it into its position and rotate it into the locked orientation. This gives the spanner a defined resting position rather than leaving it loose on a peg. Tool thickness and profile still matter, so check fit with your actual spanners.

08 / Five tray layouts

BUILD YOURWORKING SURFACE.

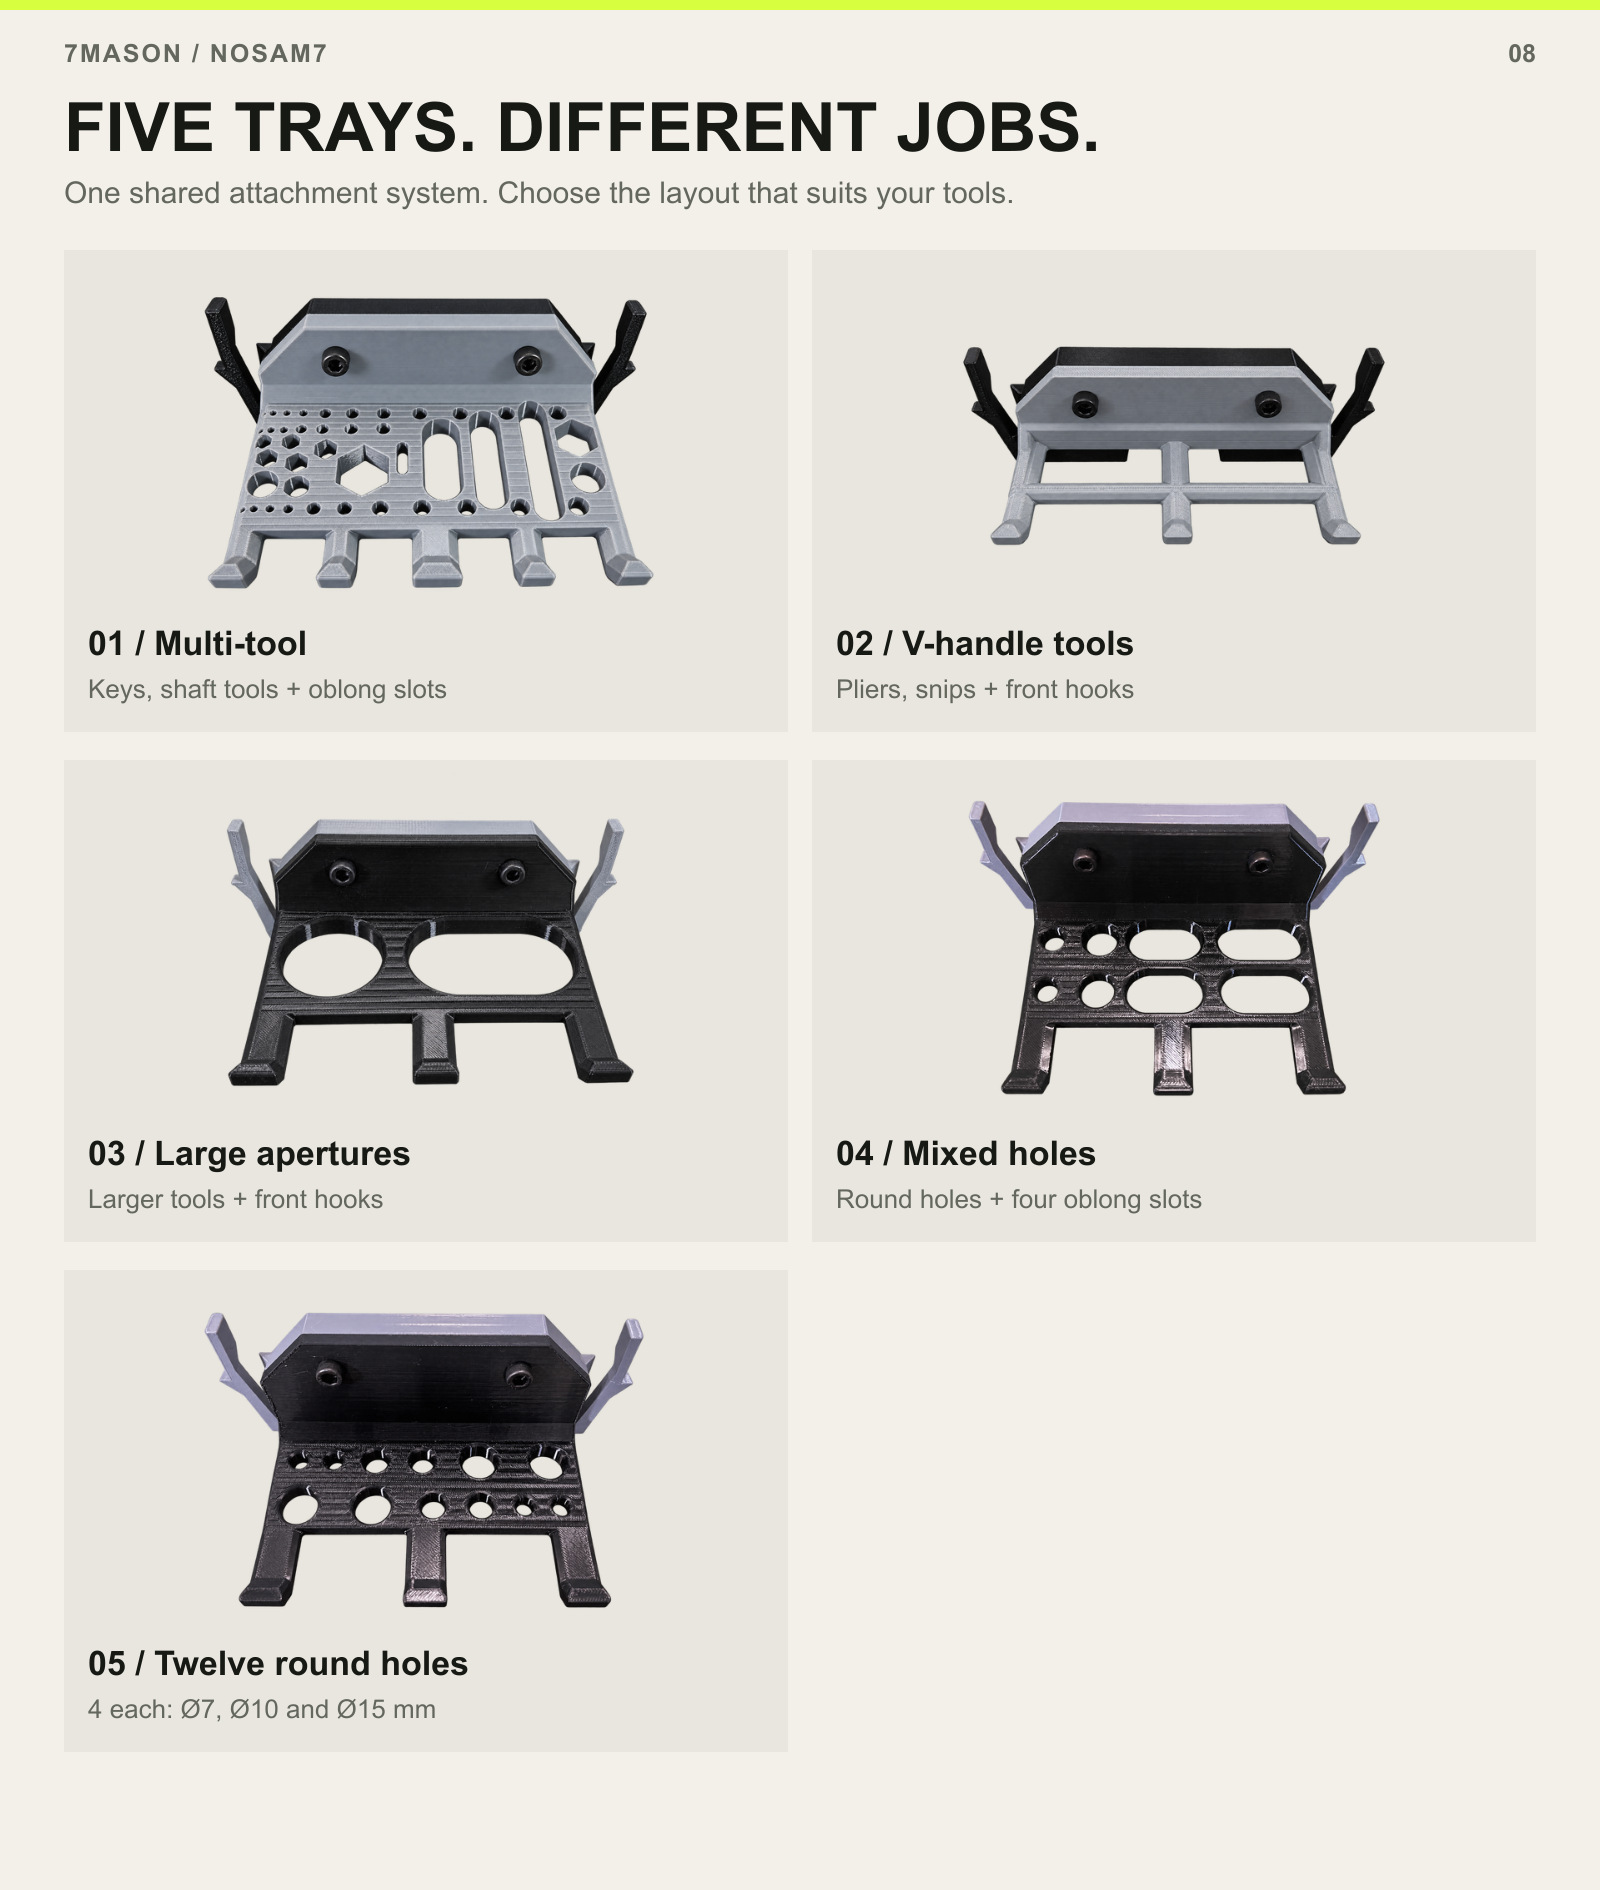
FIVE TRAYS. DIFFERENT JOBS. — 01 / Multi-tool, 02 / V-handle tools, 03 / Large apertures, 04 / Mixed holes, 05 / Twelve round holes

Five tray layouts provide open, visible storage for different tools. They are especially useful on the fixed pegboard and can also be attached to the unfolding toolbox through the same interface. Front L-hooks add hanging positions alongside the holes and slots. The empty and loaded views below show both the layout and example uses.

01

Tray 1 — the multi-tool workstation

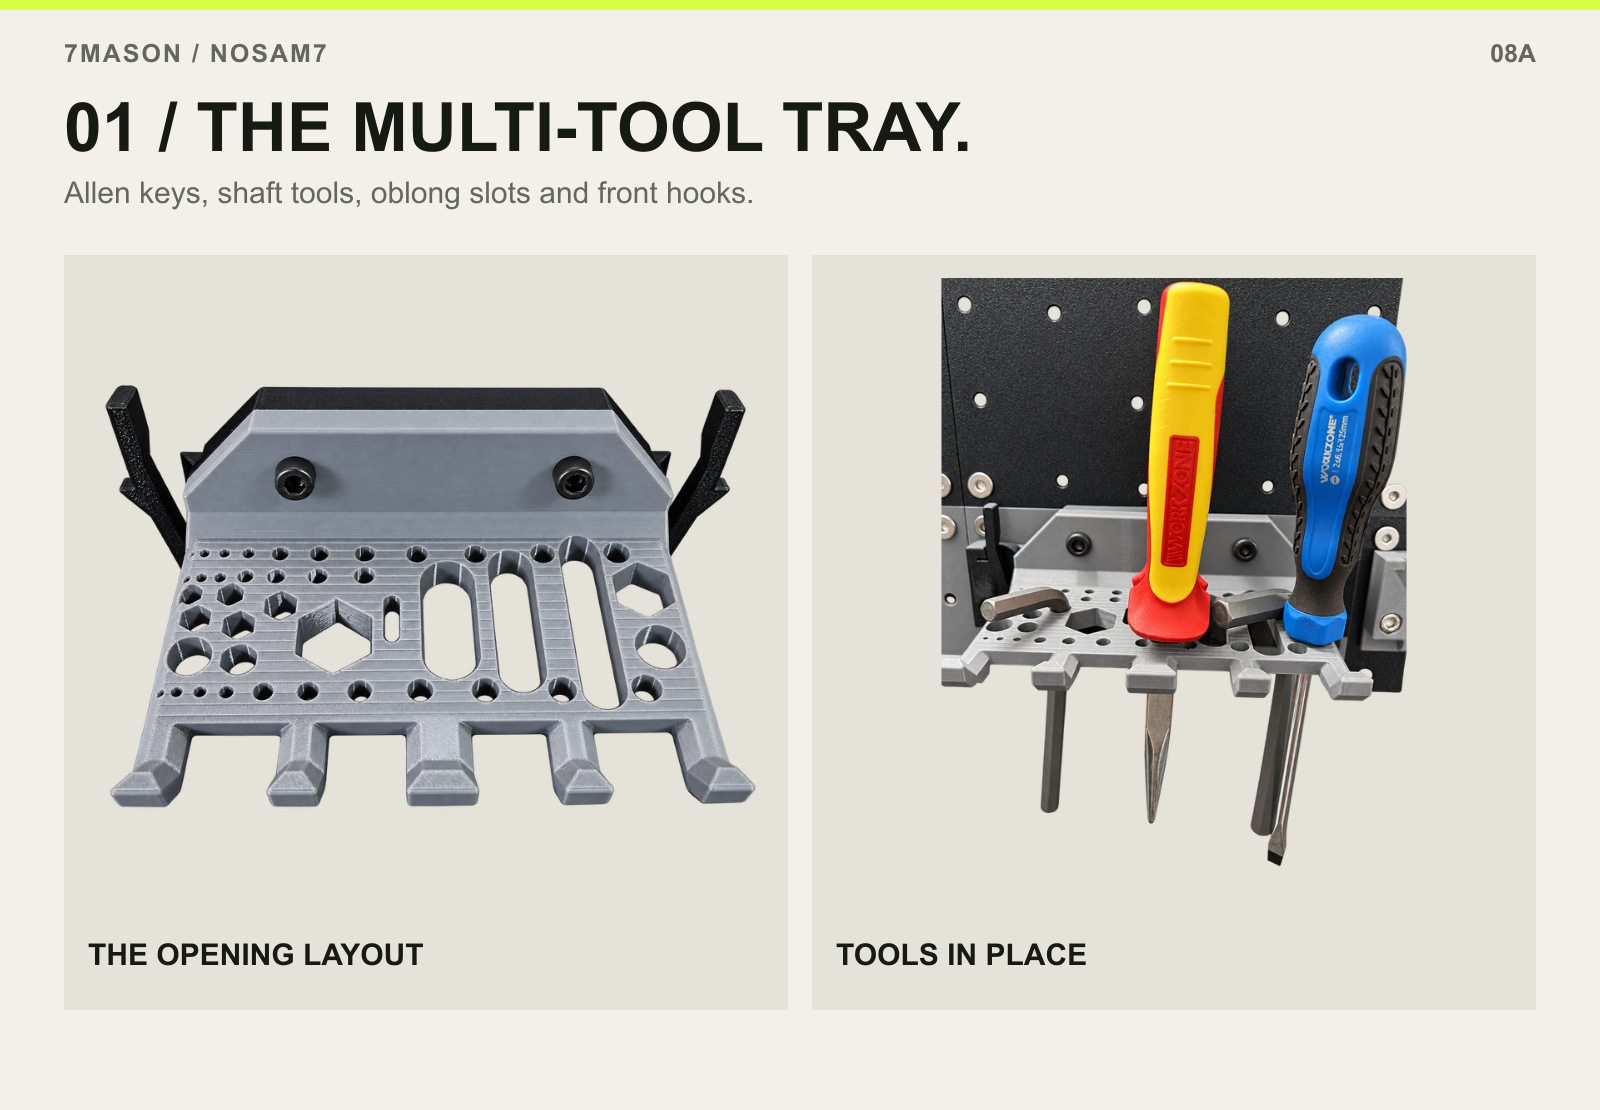
01 / THE MULTI-TOOL TRAY. — THE OPENING LAYOUT and TOOLS IN PLACE.

A mixed layout for the small hand tools you reach for together. It combines Allen-key positions, two sets of round shaft-tool holes and three oblong openings for compatible snips or other tools. Four small L-hooks and one large L-hook run along the front.

The loaded example shows how different tool forms can share the tray; the full set of openings is visible in the empty view.

  • Allen-key sizes: 2, 2.5, 3, 3.5, 4, 4.5, 5, 5.5, 6, 7, 8, 10 and 12 mm.
  • Shaft tools: two sets of Ø3, 4, 5, 6, 7, 8, 9, 10 and 12 mm positions.
  • Oblong openings: two at 15 × 50 mm and one at 12 × 54 mm.
  • Front storage: four small L-hooks and one large L-hook.
02

Tray 2 — V-handled tools

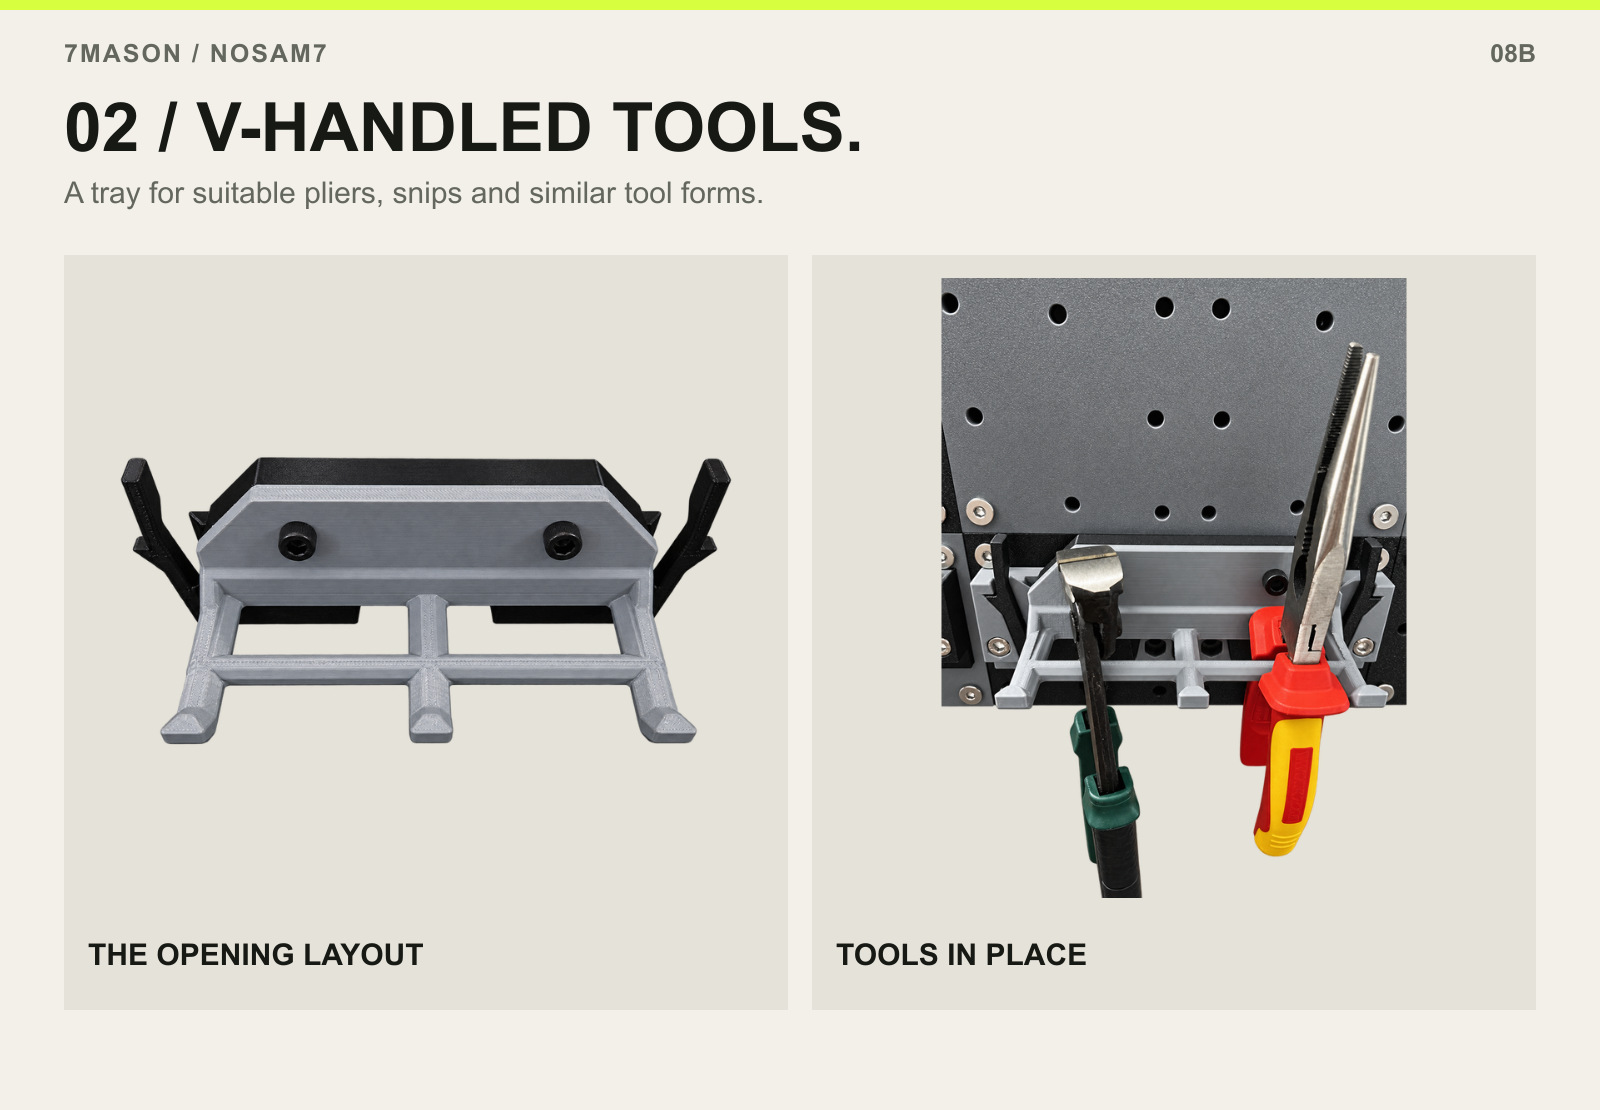
02 / V-HANDLED TOOLS. — THE OPENING LAYOUT and TOOLS IN PLACE.

This layout supports suitable pliers, snips and other tools with a V-shaped handle arrangement. The tool hangs through the opening with its handles above the tray, keeping the working end below and the grips easy to reach.

Three medium L-hooks provide additional hanging positions at the front. Check that your tool’s handles sit securely on the tray and cannot pass through the opening; not every V-handled tool has the same profile.

03

Tray 3 — larger tool openings

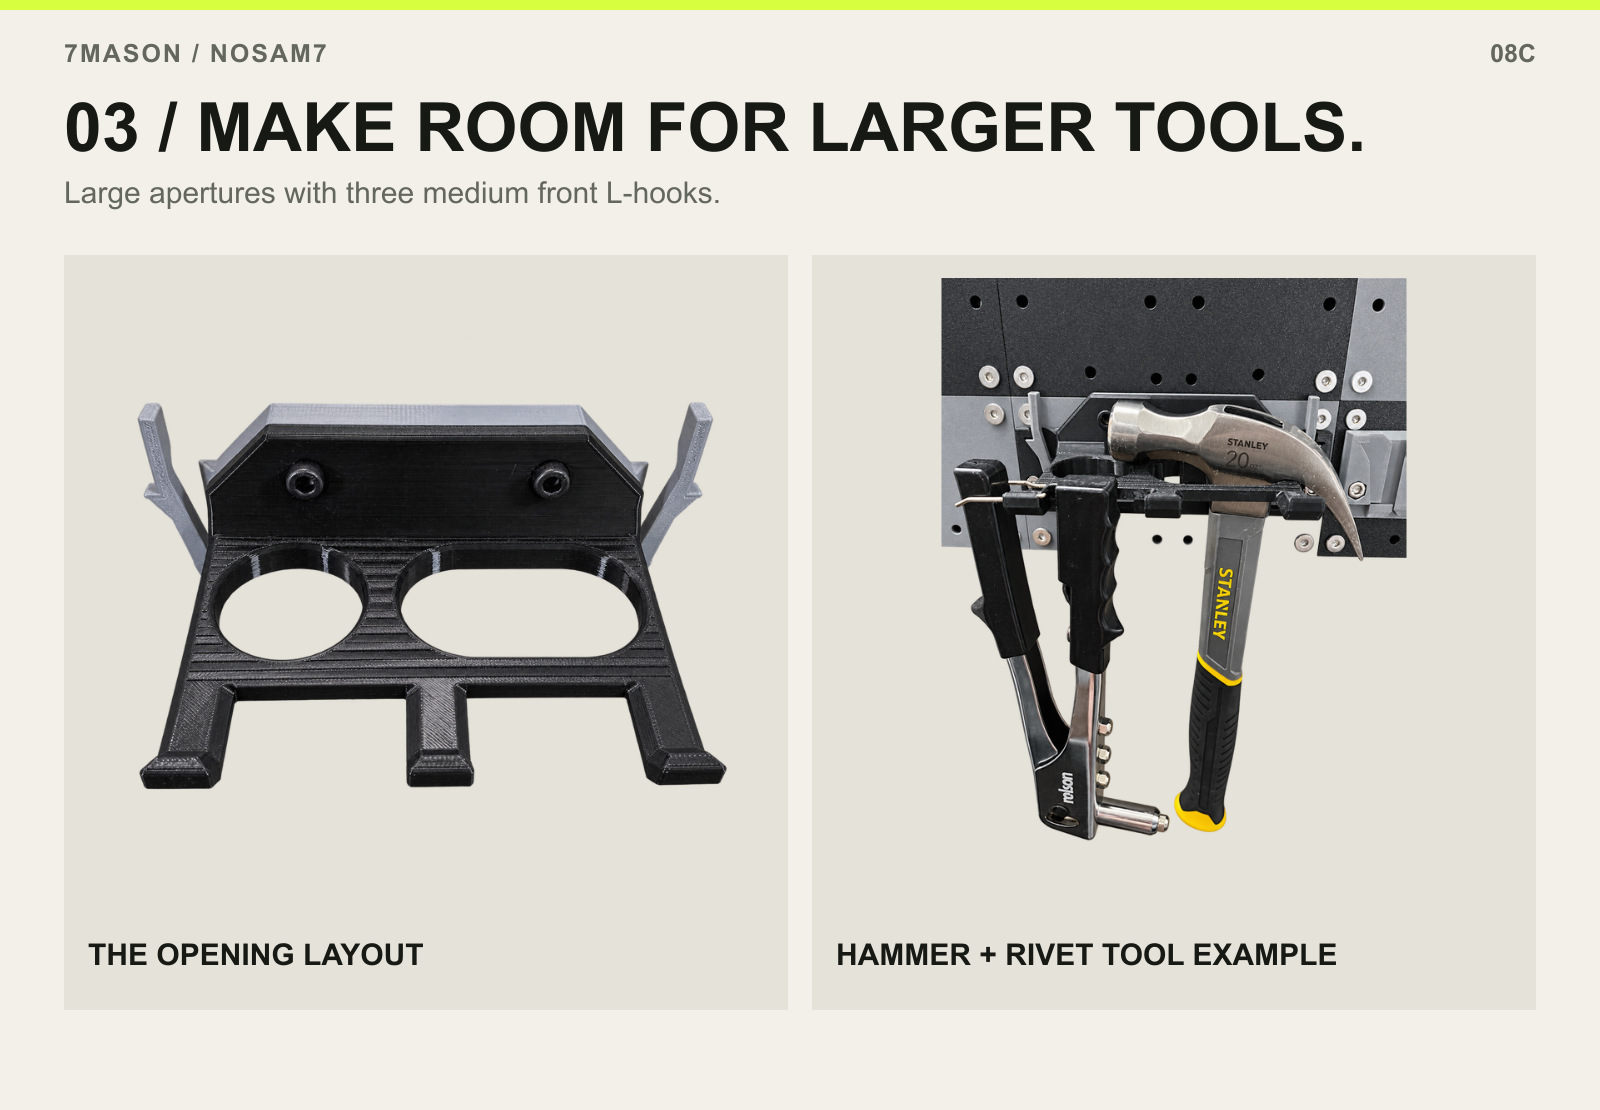
03 / MAKE ROOM FOR LARGER TOOLS. — THE OPENING LAYOUT and HAMMER + RIVET TOOL EXAMPLE.

Larger apertures make room for tools that do not suit the smaller shaft holes. The loaded example shows a compatible hammer and rivet tool suspended through the tray. Choose the opening by the part of the tool that passes through it and the shape that rests above it.

Three medium L-hooks extend the usable storage along the front edge. This is a different layout from the V-handle tray: it is intended for larger tool profiles, not a claim that every hammer or heavy tool will fit.

04

Tray 4 — round holes and oblong slots

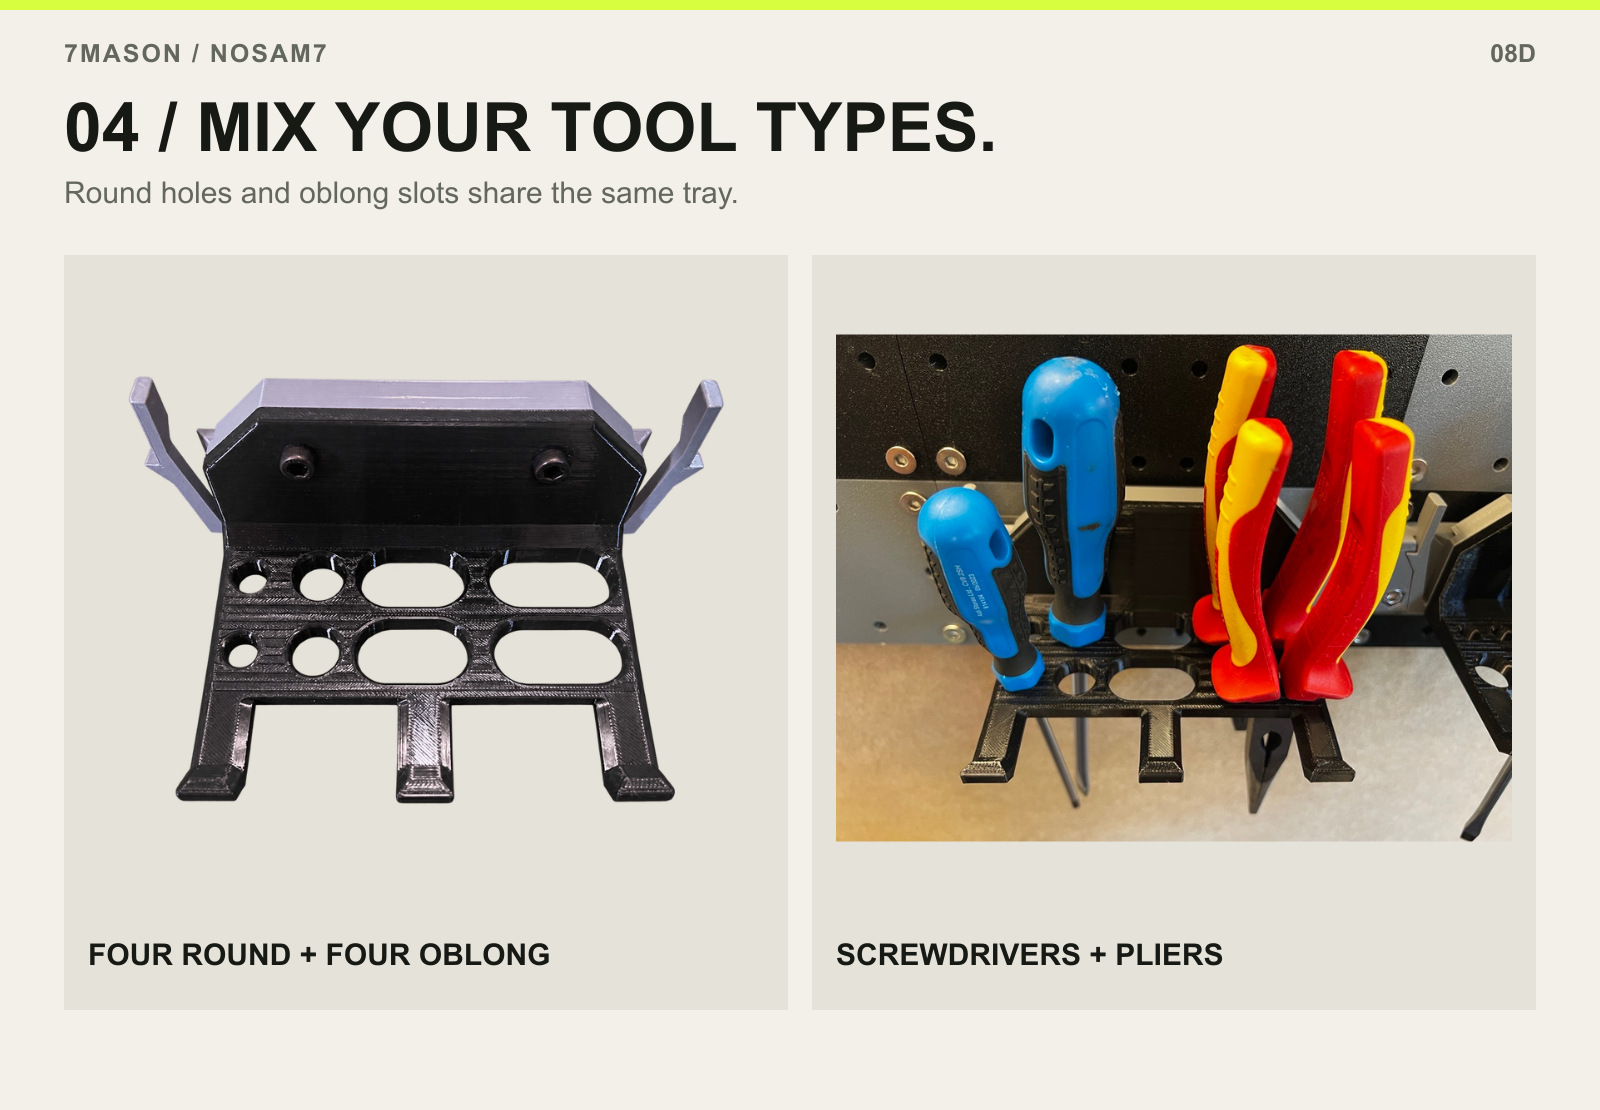
04 / MIX YOUR TOOL TYPES. — FOUR ROUND + FOUR OBLONG and SCREWDRIVERS + PLIERS.

A combined layout for shaft tools and suitable pliers or snips. Two Ø10 mm holes and two Ø15 mm holes sit alongside four oblong slots: two at 20 × 35 mm and two at 20 × 40 mm. Three medium L-hooks complete the front edge.

The loaded view shows screwdrivers and red/yellow-handled pliers sharing the tray. Match the opening to the tool profile and leave enough clearance to lift each tool out without disturbing its neighbours.

05

Tray 5 — twelve round positions

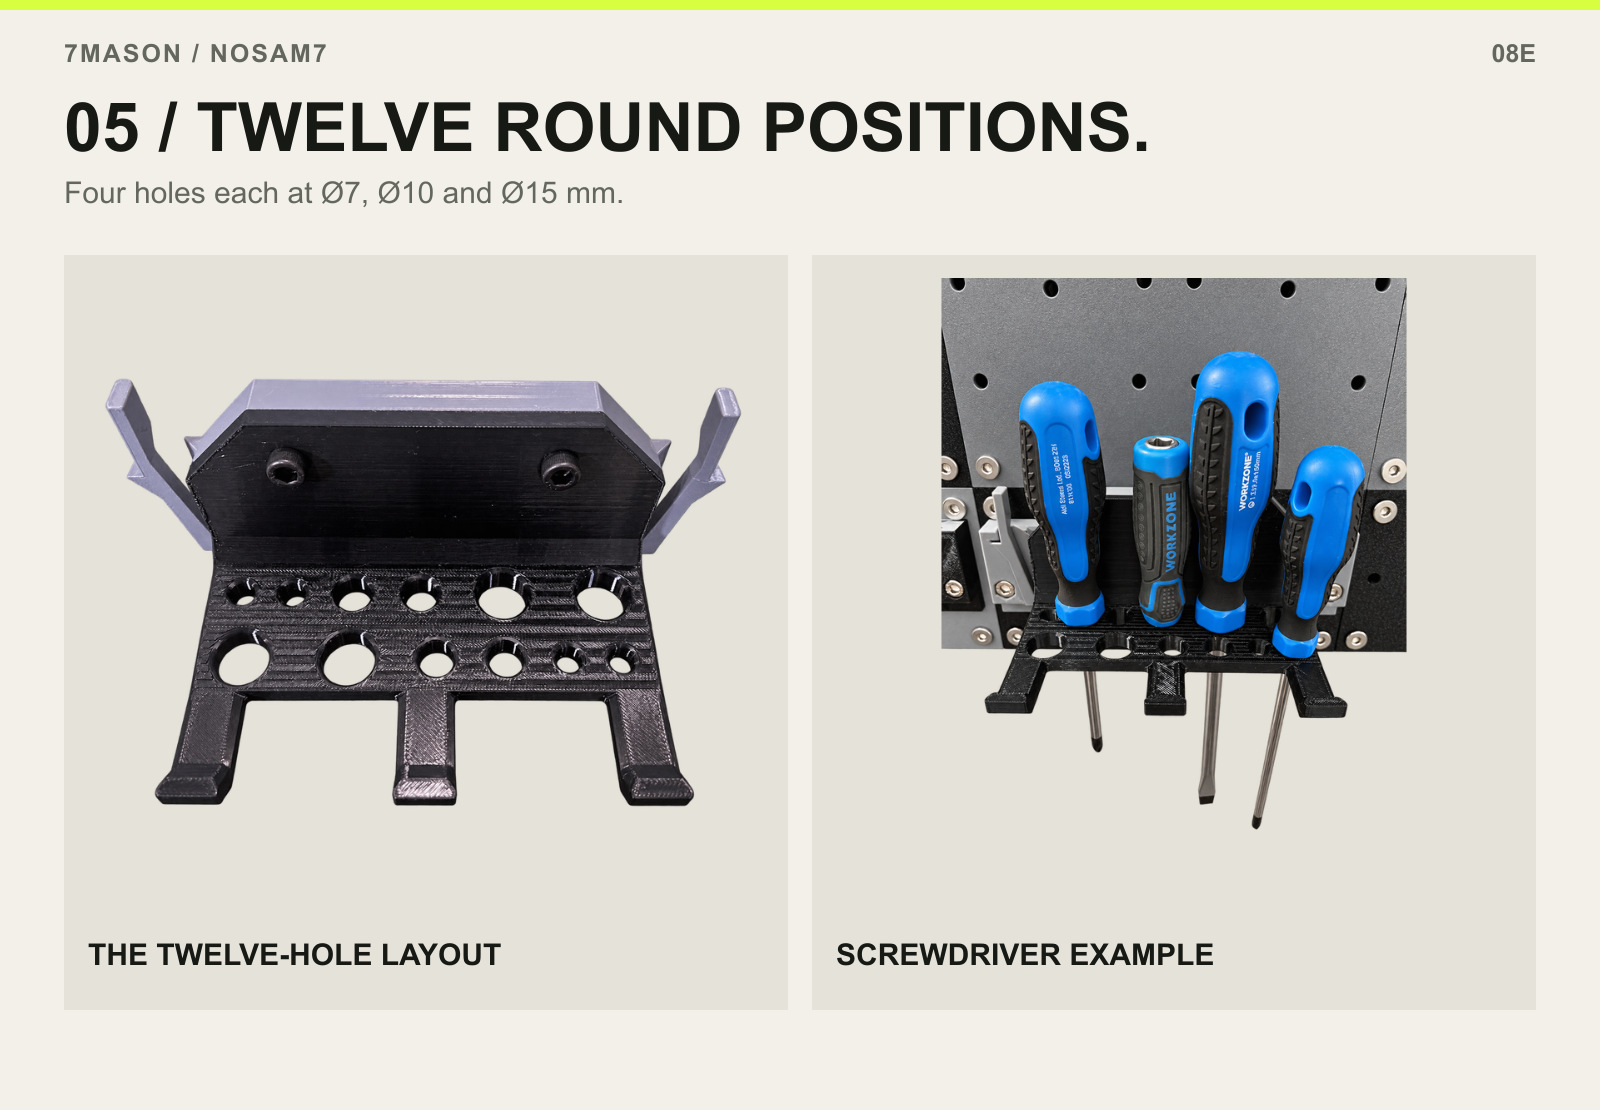
05 / TWELVE ROUND POSITIONS. — THE TWELVE-HOLE LAYOUT and SCREWDRIVER EXAMPLE.

A dedicated round-hole layout for screwdriver-like shaft tools. There are twelve holes in total: four each at Ø7, Ø10 and Ø15 mm, arranged as two sets containing two of each size. Three medium L-hooks add front hanging positions.

The tool shaft passes through a suitable hole and the larger handle or shoulder rests above the tray. Unlike the dedicated screwdriver rack and W-grip holders, these openings are pass-through supports, not a shaft-gripping snap mechanism. The loaded photograph shows example screwdriver placement.

09 / Storage that fits your layout

SORT THE SMALL PARTS.MAKE ROOM FOR THE BIG.

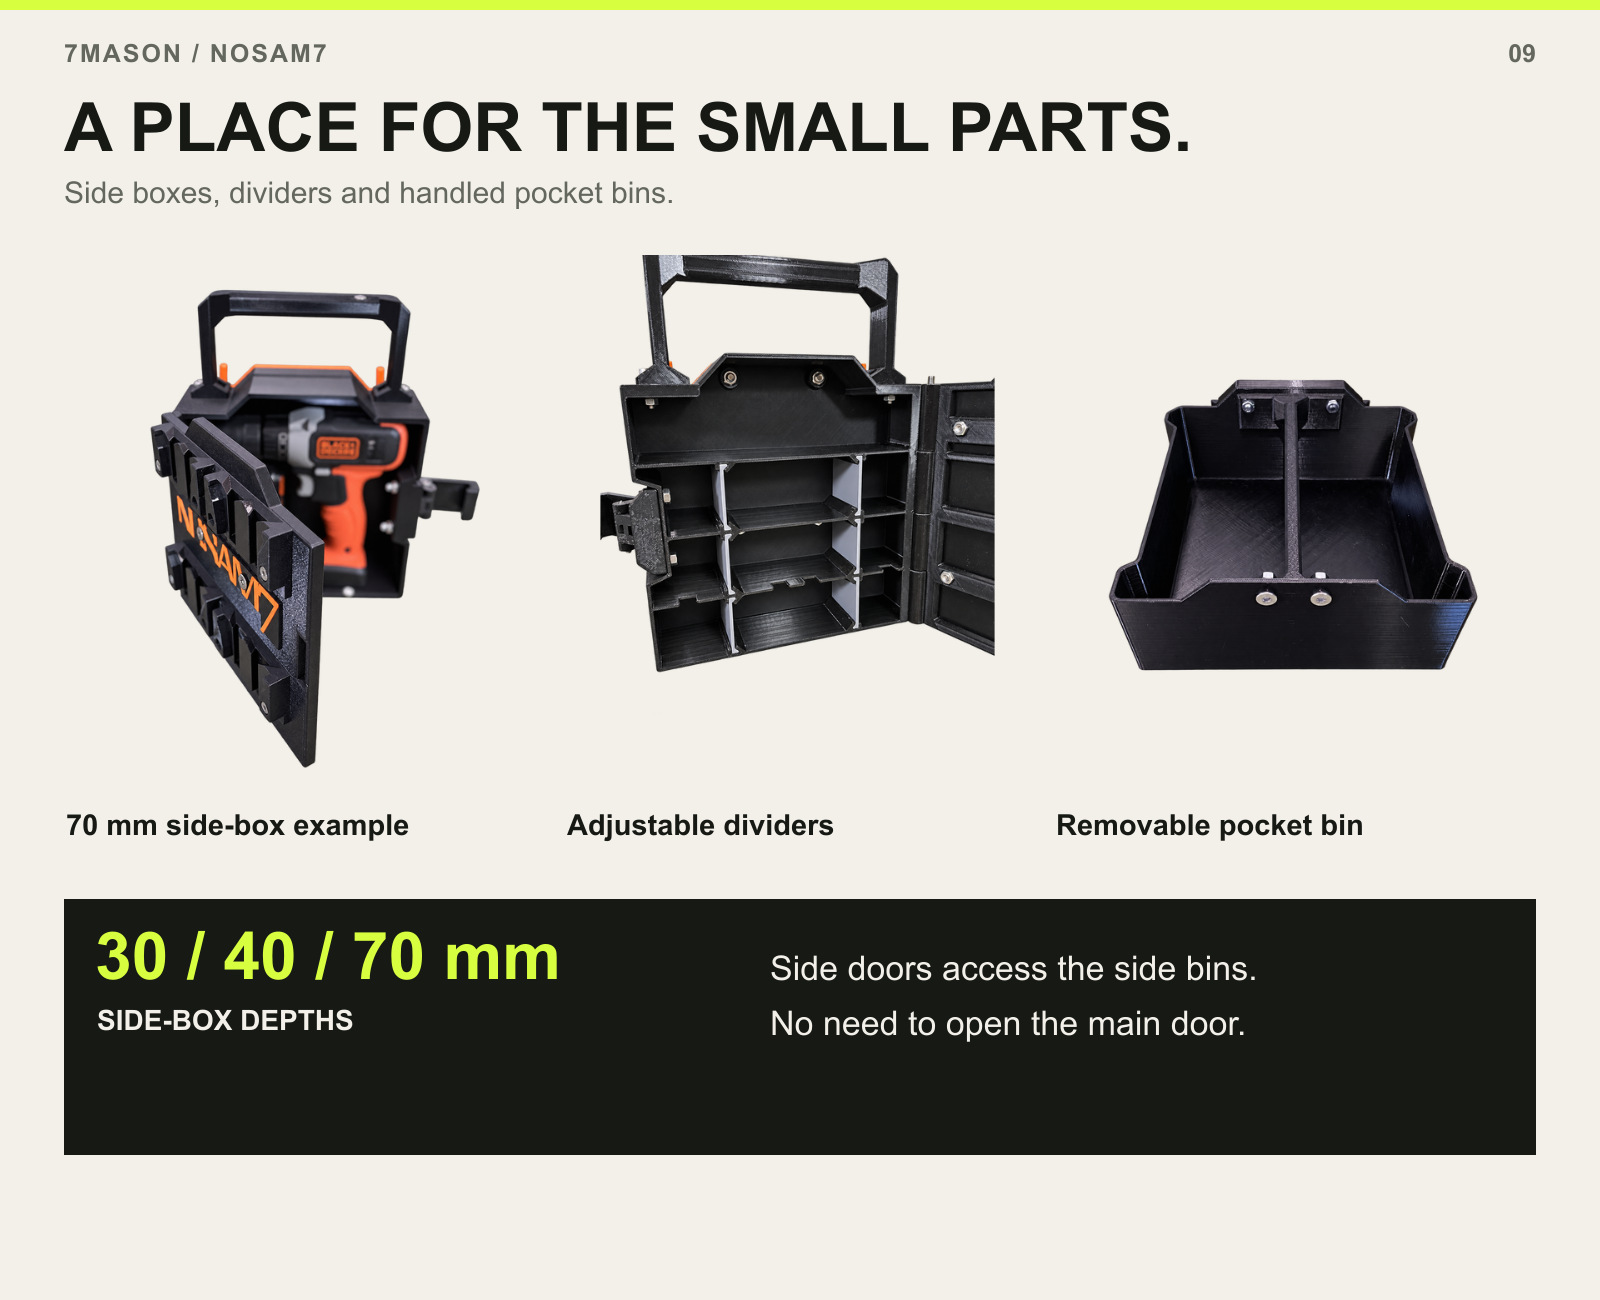
Three storage examples: deeper side box with drill, adjustable dividers and a removable pocket bin. Side-box depths 30, 40 and 70 mm.

Side boxes come in three depths — 30, 40 and 70 mm — so you can choose the space a tool or group of parts needs. These numbers describe the side-box depth, not the dimensions of the complete toolbox. Versions include an open interior, a fixed divider and removable sliding dividers.

The removable dividers can be added, moved or taken out to change the compartment layout for nuts, screws and other small items. The 70 mm-deep example holds the illustrated drill and battery. Drill shapes vary, so measure your own tool before choosing a box.

Side boxes use the double SnapDock interface. They can sit next to each other or in vertically arranged layouts on compatible mounting positions, letting you distribute storage around the board or toolbox.

The handled pocket bins are removable internal storage. Their matching shapes use the toolbox space and help reduce movement between neighbouring bins. Lift a bin out to work from it, then return it to its position. The side bins can be reached through the side doors without opening the main toolbox door.

The side boxes have their own printable closure latch. It is part of the box mechanism, not an optional accessory or a separately purchased latch. The two closure designs are shown with the main toolbox earlier in the story.

10 / The everyday essentials

THE FINISHING TOUCHES.

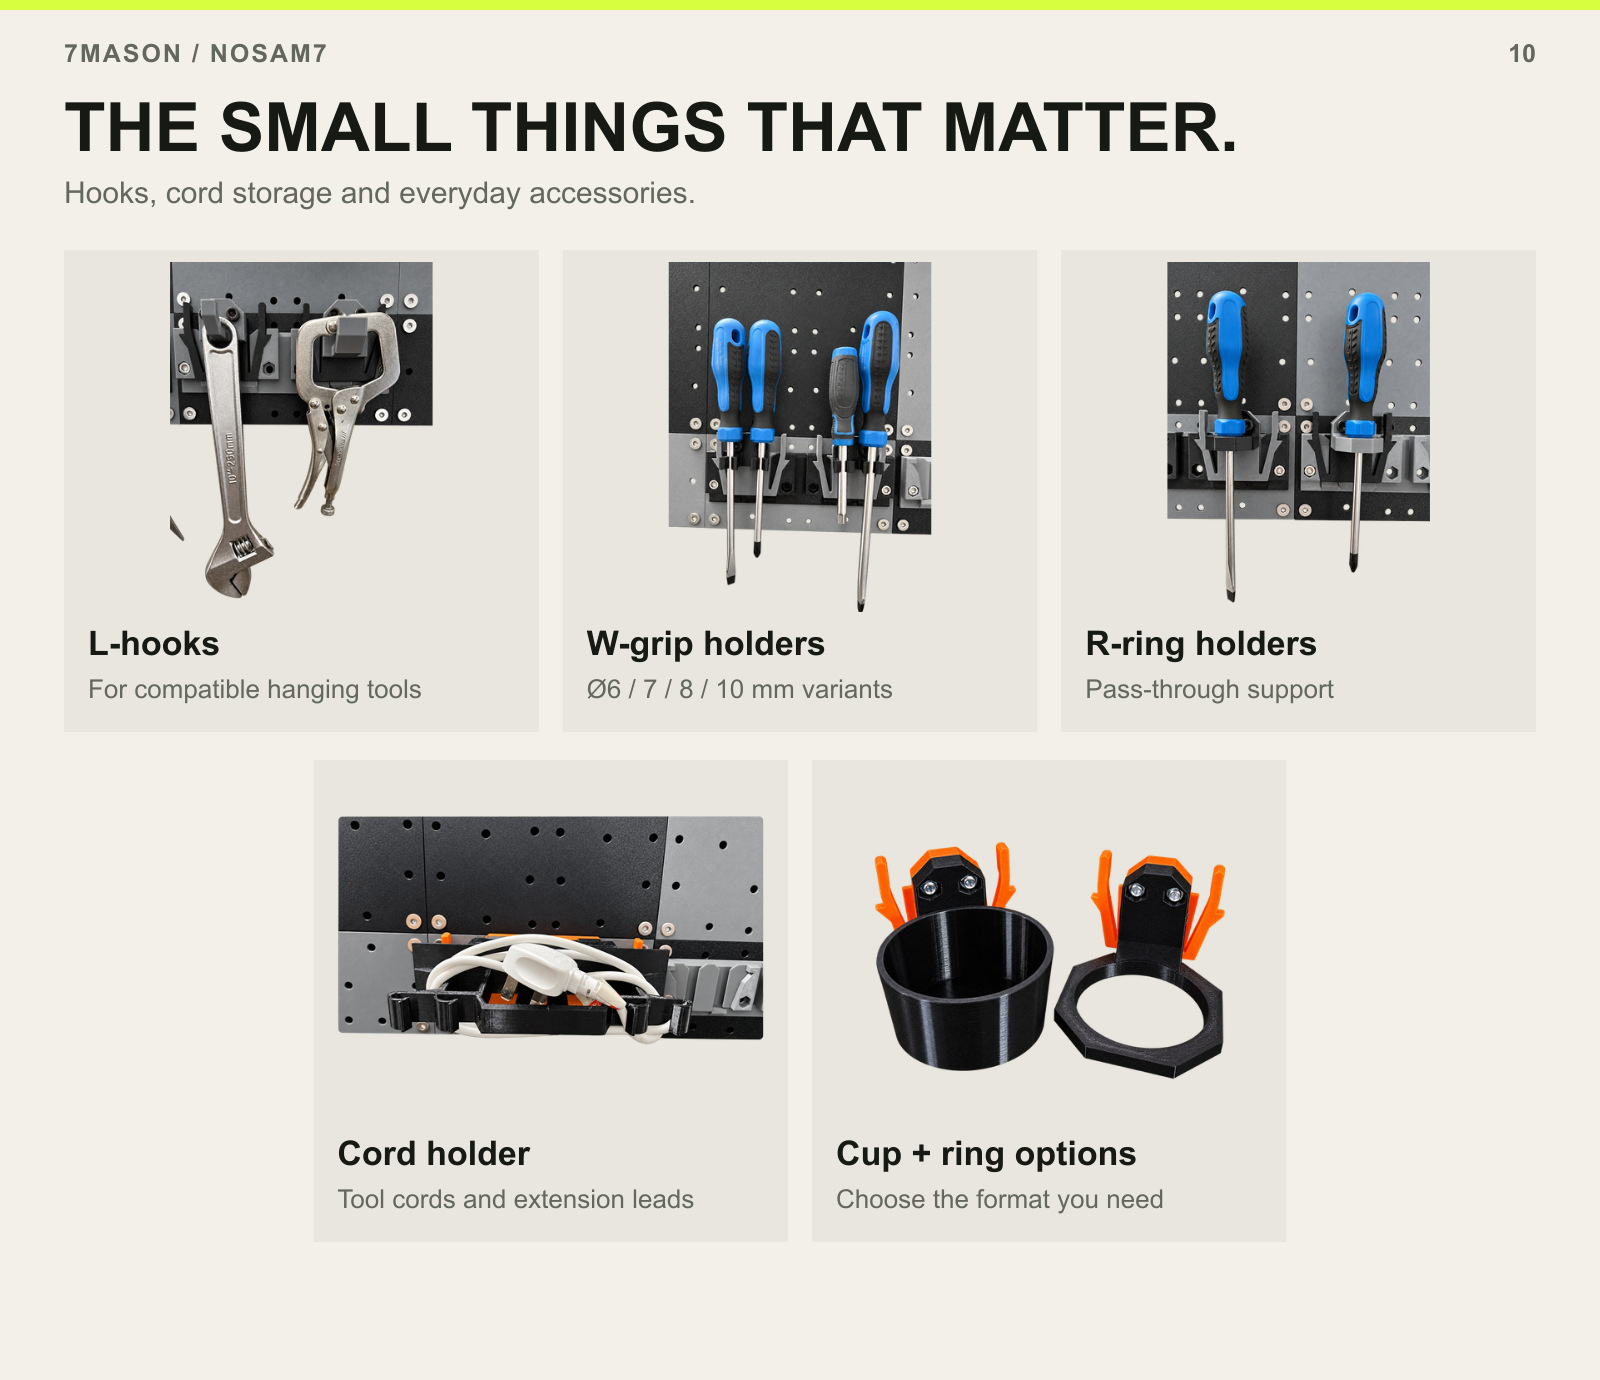
THE SMALL THINGS THAT MATTER. — L-hooks, W-grip holders, R-ring holders, Cord holder, Cup + ring options

The smaller modules fill the gaps around your main racks and trays. Choose a hanging hook, a gripping holder or a pass-through ring according to how the tool should be supported. These are distinct mechanisms, not interchangeable descriptions of the same hook.

01

L-hooks — hanging tools and accessories

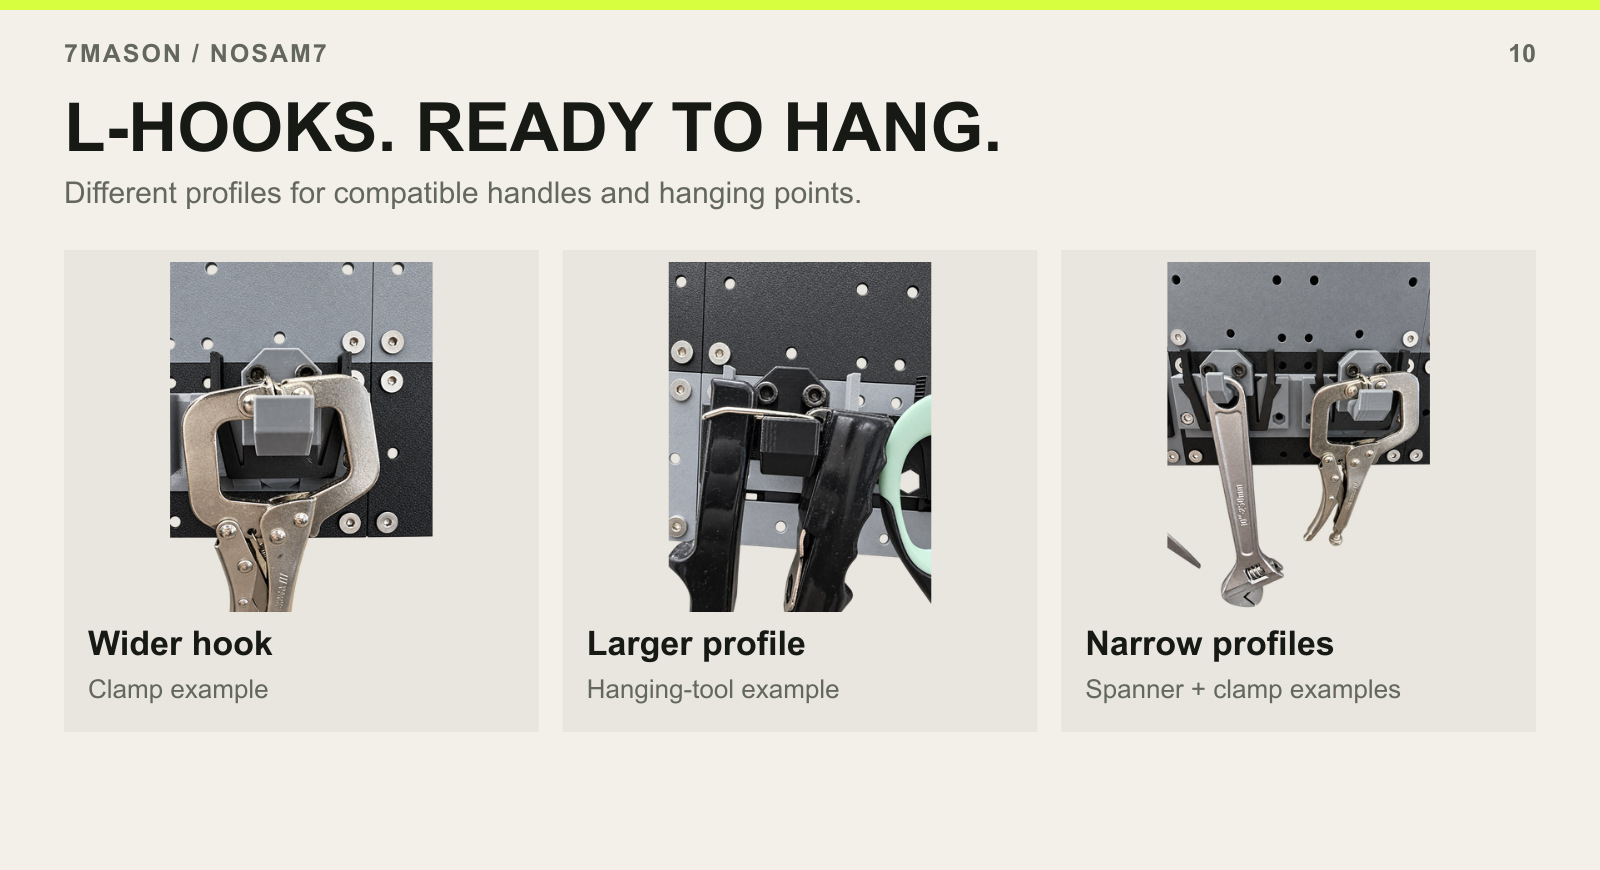
L-HOOKS. READY TO HANG. — Wider hook, Larger profile, Narrow profiles

The L-hook family includes shorter and longer narrow hooks as well as larger, thicker forms. They provide a simple hanging point for tools or accessories with a suitable ring, opening or handle. The loaded photographs show different hook profiles supporting example workshop tools.

Each uses the single connector, which can also be fitted to a double receiver. Select the profile that supports the item without forcing it, and check that the item remains seated in the position you intend to use.

02

W-grip holders — two shafts per module

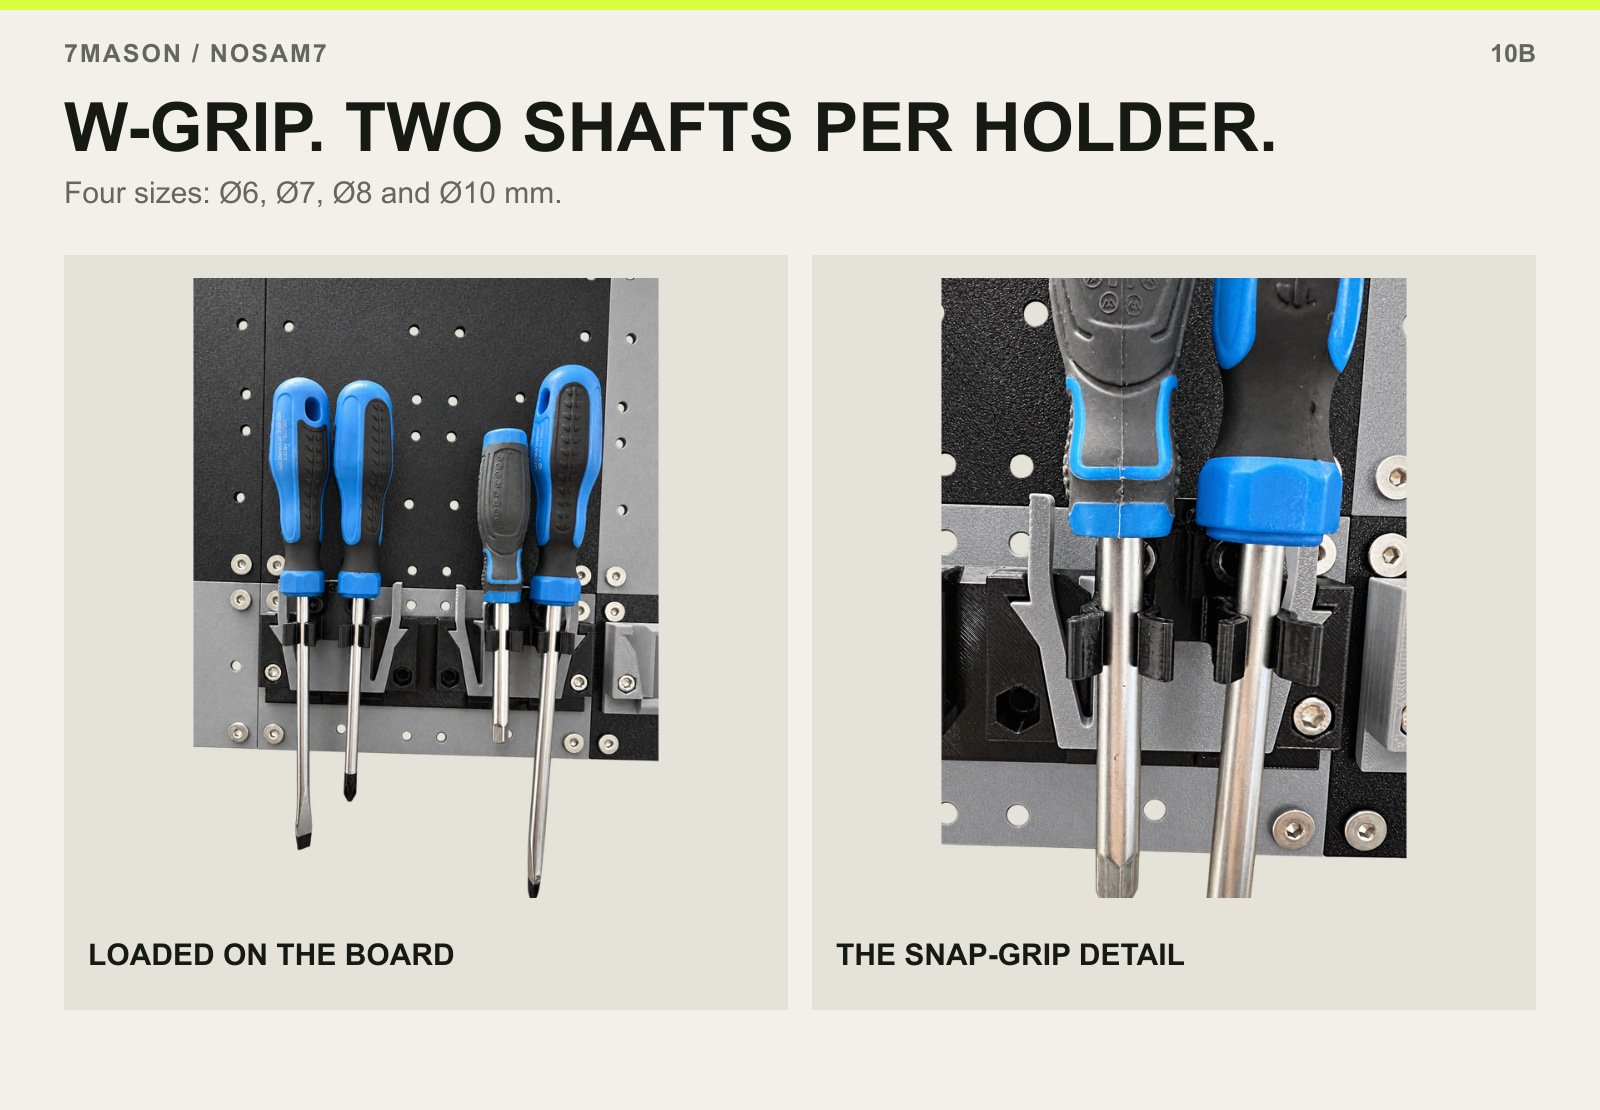
W-GRIP. TWO SHAFTS PER HOLDER. — LOADED ON THE BOARD and THE SNAP-GRIP DETAIL.

W-grip holders are available for Ø6, Ø7, Ø8 and Ø10 mm shafts. Each holder has two positions, making it useful for a pair of screwdrivers or compatible straight-shaft tools.

The shaft presses into a snap-gripping opening and is held by the grip of the printed form. Choose the size by the shaft diameter and check your PETG print’s fit. This is the gripping option, rather than the open ring support shown next.

03

R-ring holders — pass-through support

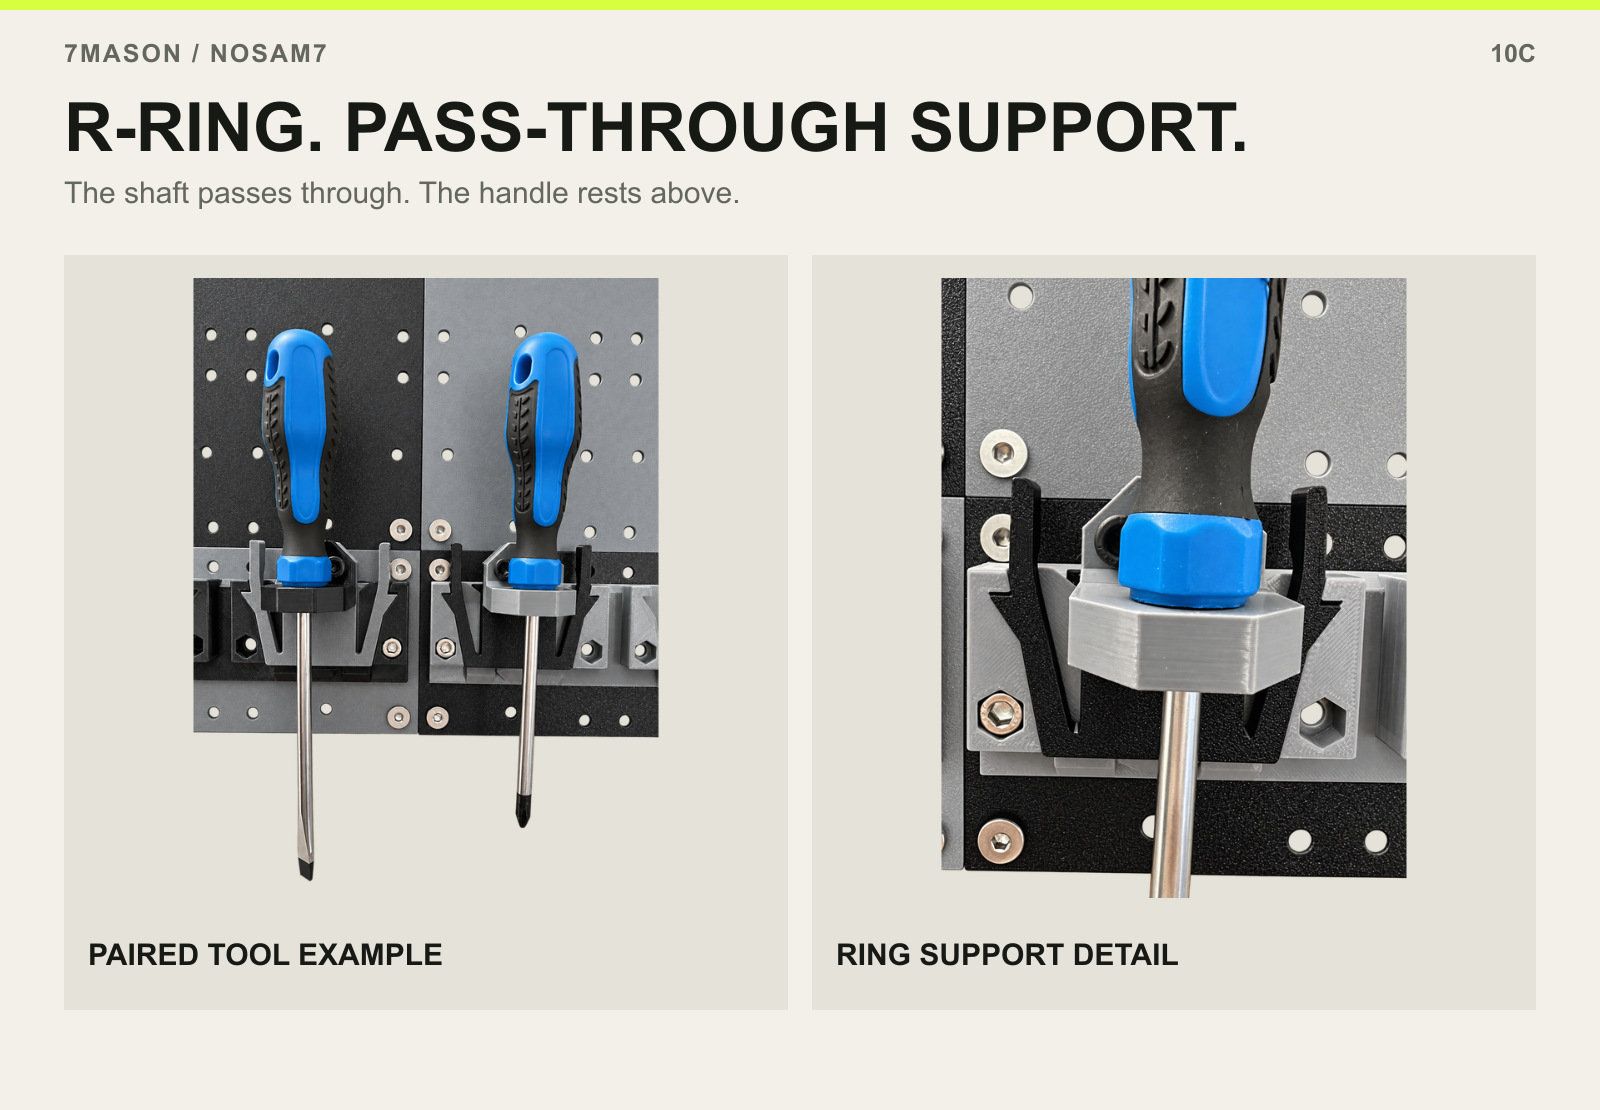
R-RING. PASS-THROUGH SUPPORT. — PAIRED TOOL EXAMPLE and RING SUPPORT DETAIL.

An R-ring holder supports a compatible tool by letting its shaft pass through the ring while its larger handle or shoulder stays above it. The loaded views show screwdrivers resting in the rings.

There is no W-style snap grip here. Choose this format when a simple pass-through support suits the tool and its position on the board, and make sure the handle cannot slip through the ring.

04

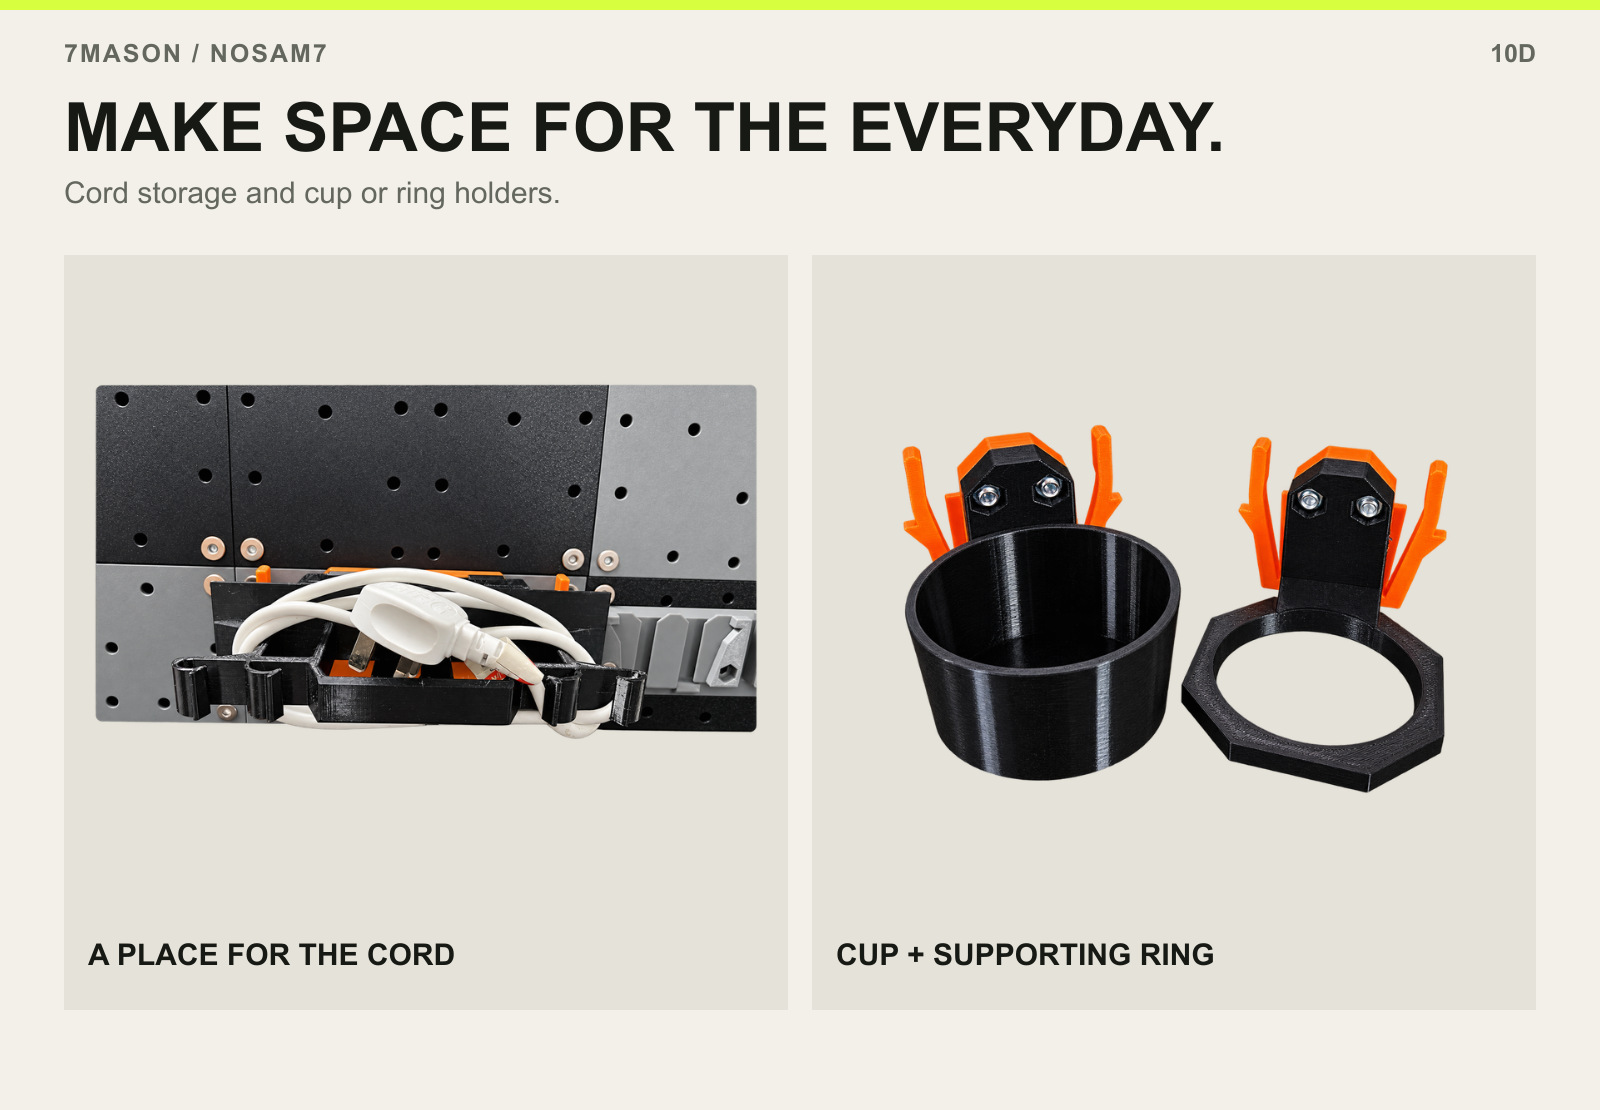
Cord storage and cup holders

MAKE SPACE FOR THE EVERYDAY. — A PLACE FOR THE CORD and CUP + SUPPORTING RING.

The cord holder gives a tool lead or extension lead a defined place in the layout. The photographs show the cord wound around the holder, including a fitted example on the board. Store the lead neatly; follow the lead manufacturer’s instructions about fully unwinding it before use.

Cup holders are provided in both a cup-shaped form and a supporting-ring form. Choose the format that suits the item you want to keep beside the work area, and check its fit and balance before loading.

11 / Print at home

PETG.NO SUPPORTS.

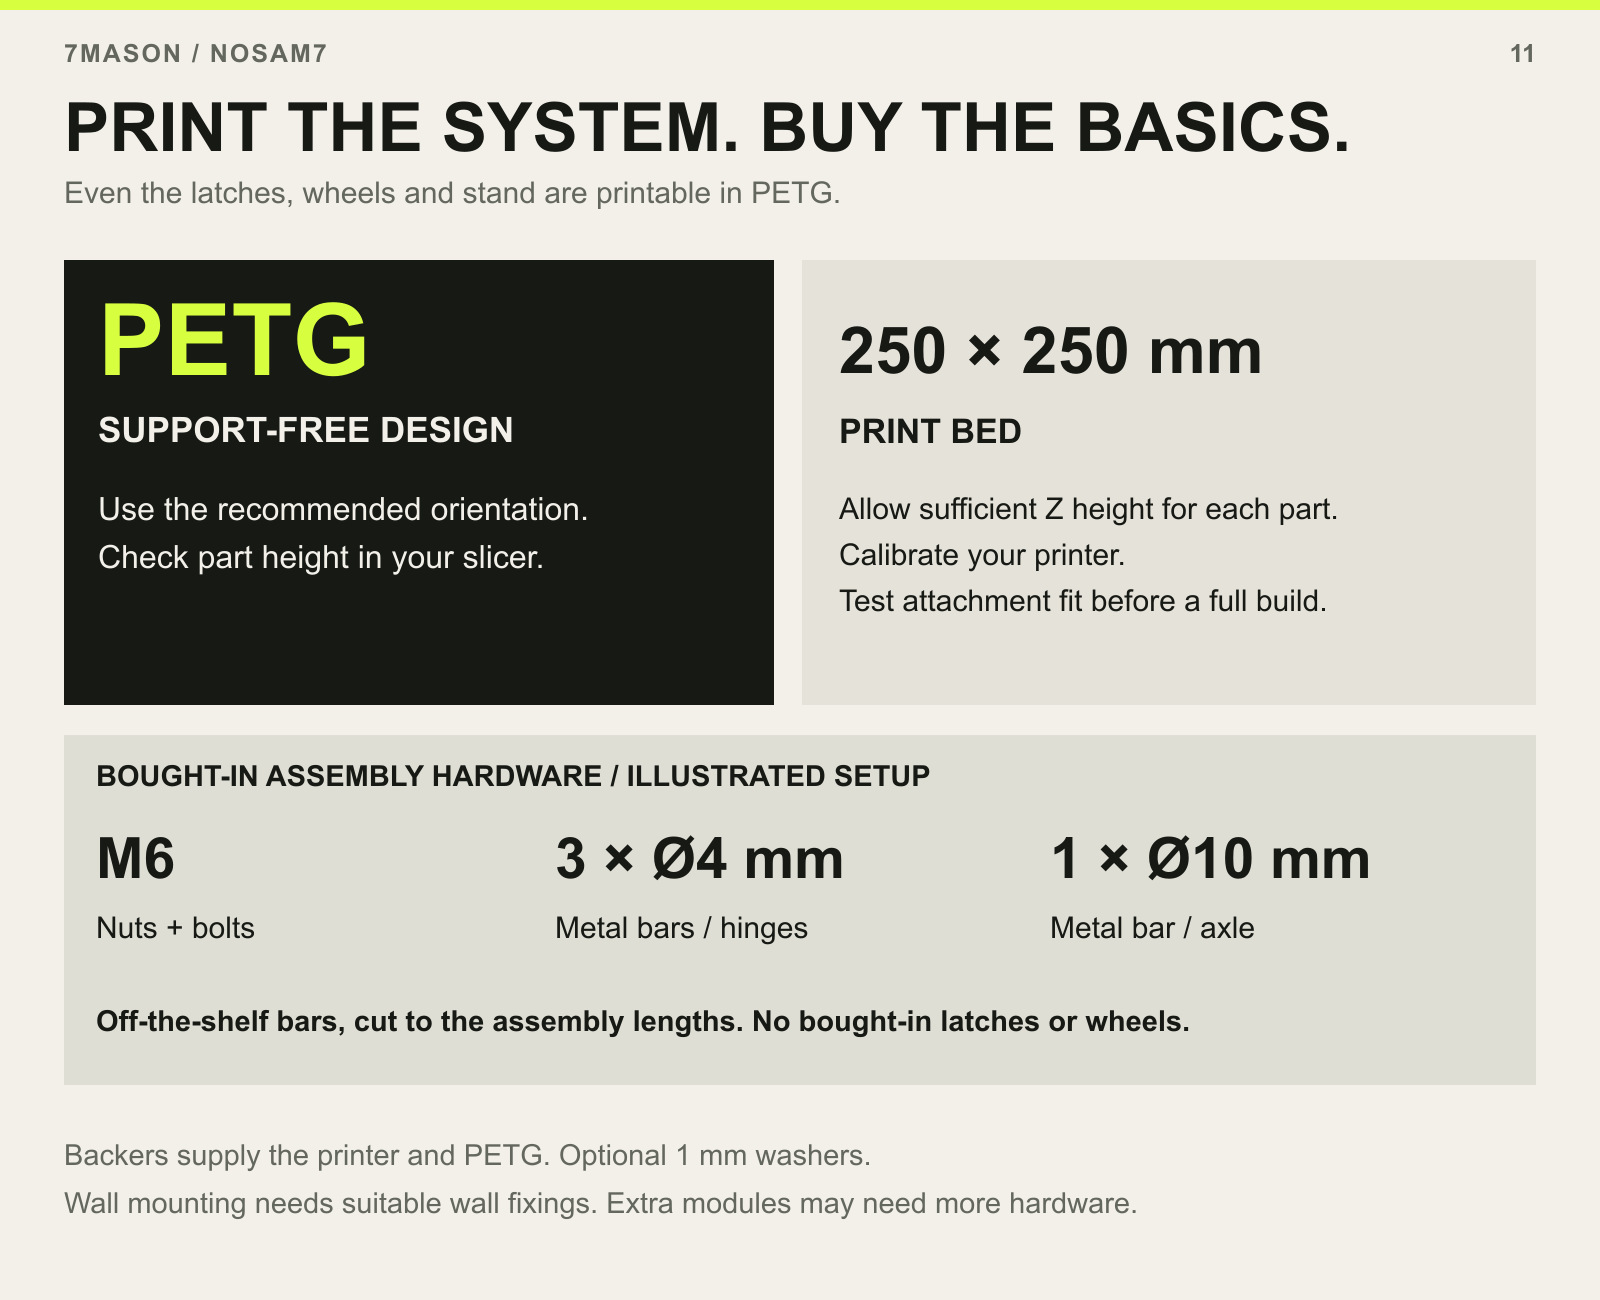
Printable PETG system including latches, wheels and stand. Support-free orientation and 250 by 250 mm bed with sufficient height. For the illustrated setup: M6 nuts and bolts, three 4 mm metal bars for hinges and one 10 mm metal bar for the axle. Wall fixings are additional for wall mounting.

Every printed component is designed to be support-free in its recommended orientation. Use PETG throughout and a printer with a 250 × 250 mm build area. Check the height of each oriented part against your printer’s Z capacity before starting.

Any printers with the required build area should be suitable, but calibration, extrusion and material behaviour affect fit. Test the attachment fit before committing to a complete setup.

Print the system, buy the basics. The toolbox and side-box latches, wheels, stand, connectors, boards and storage are printable parts, not a shopping list of proprietary fittings. For the illustrated setup, source standard M6 nuts and bolts, three Ø4 mm metal bars for the hinge pins and one Ø10 mm metal bar for the wheel axle. Ordinary off-the-shelf bars are cut to the assembly lengths; extra boxes or repeated modules may need additional hardware.

Most joints capture the nut in a pocket, so one tool is enough; a few joints need a second tool. Clearance is provided for optional 1 mm-thick washers. Periodically check fastener tightness. Wall mounting additionally requires fixings suitable for the wall construction.

13 / Future development

ROOM TO GROW.

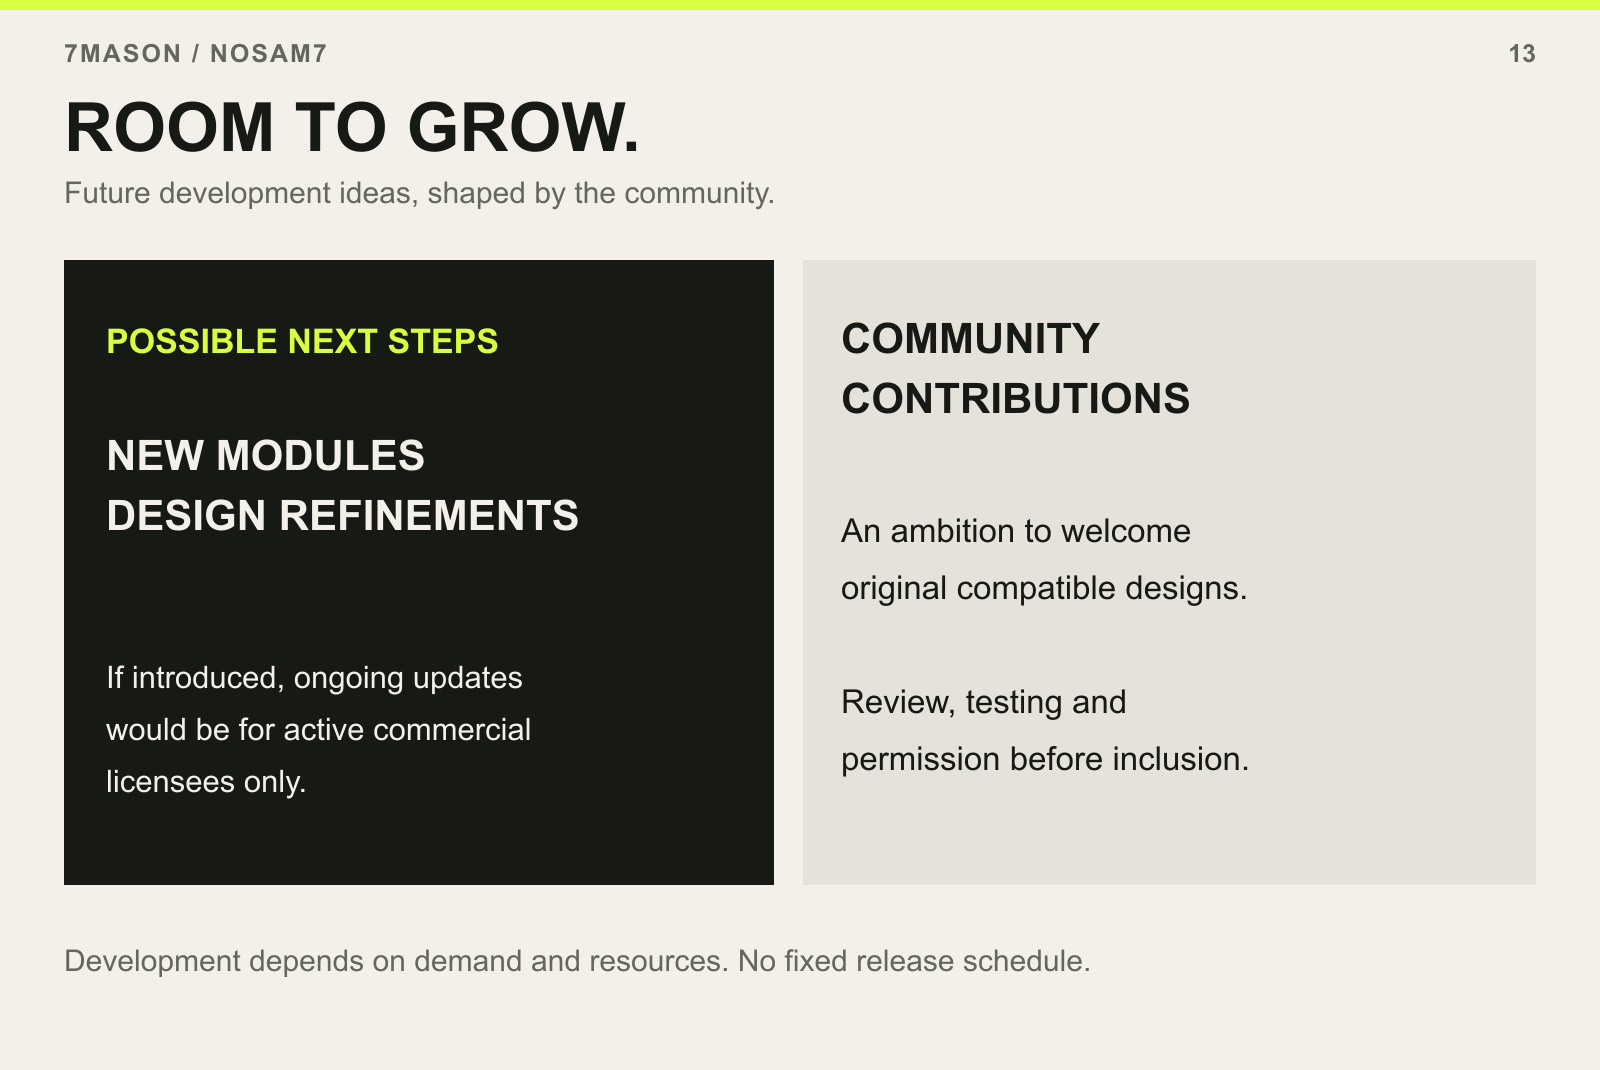
Future development aspirations: new modules and refinements, with any ongoing update programme limited to active commercial licensees, plus a possible reviewed community contribution route. No fixed release schedule.

Our ambition is to keep expanding NOSAM7 with new compatible modules and design refinements as the community grows. Further development will depend on demand, available resources and testing. These are future plans, not guaranteed campaign rewards; no funding or backer-count threshold, release frequency or lifetime updates are promised.

If an ongoing product-update programme is introduced, access will be for commercial licensees only while their licences remain valid. Personal backers receive the campaign release and any included, unlocked campaign stretch-goal files, but not an ongoing commercial update programme.

We also aim to create a route for backers to submit their own original compatible modules for review — for example, a holder for a particular drill or tool. If this route is introduced, selected, tested contributions may be added to the core collection with the contributor’s permission. Submission would not guarantee inclusion or grant permission to redistribute NOSAM7’s existing STL files.

14 / From campaign to download

FILES TO YOUR PRINTER.WITHIN ONE MONTH.

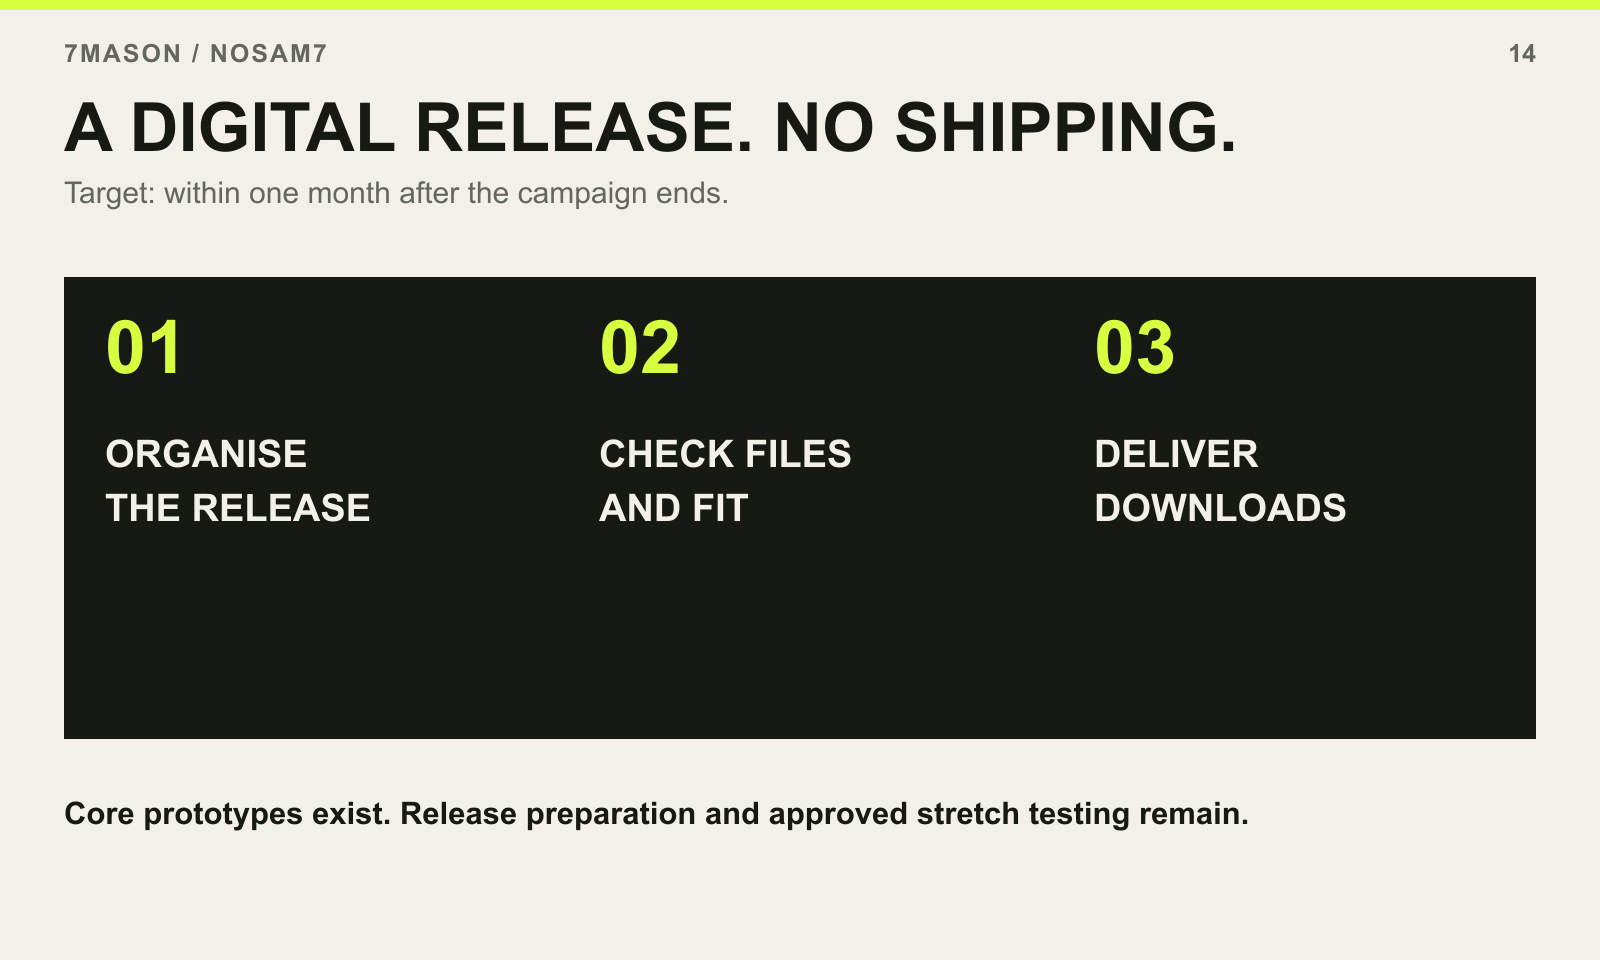
Organise the release, check files and fit, deliver downloads within one month after campaign end.

The photographed core designs already exist as printed prototypes. After the campaign, I will organise the release, check the file package and test any approved, unlocked stretch-goal designs before sending download access to eligible backers.

The target is digital delivery within one month after the campaign ends. No parcel or shipping charge is involved. Backers supply the printer, PETG, hardware and suitable wall fixings.

I’m Mason, the maker behind 7MASON. I designed NOSAM7 around a simple idea: the way you organise your tools should be able to change with the way you work. Thank you for helping bring this system to more workshops.

Together / The complete setup

Make room.
For the way you work.

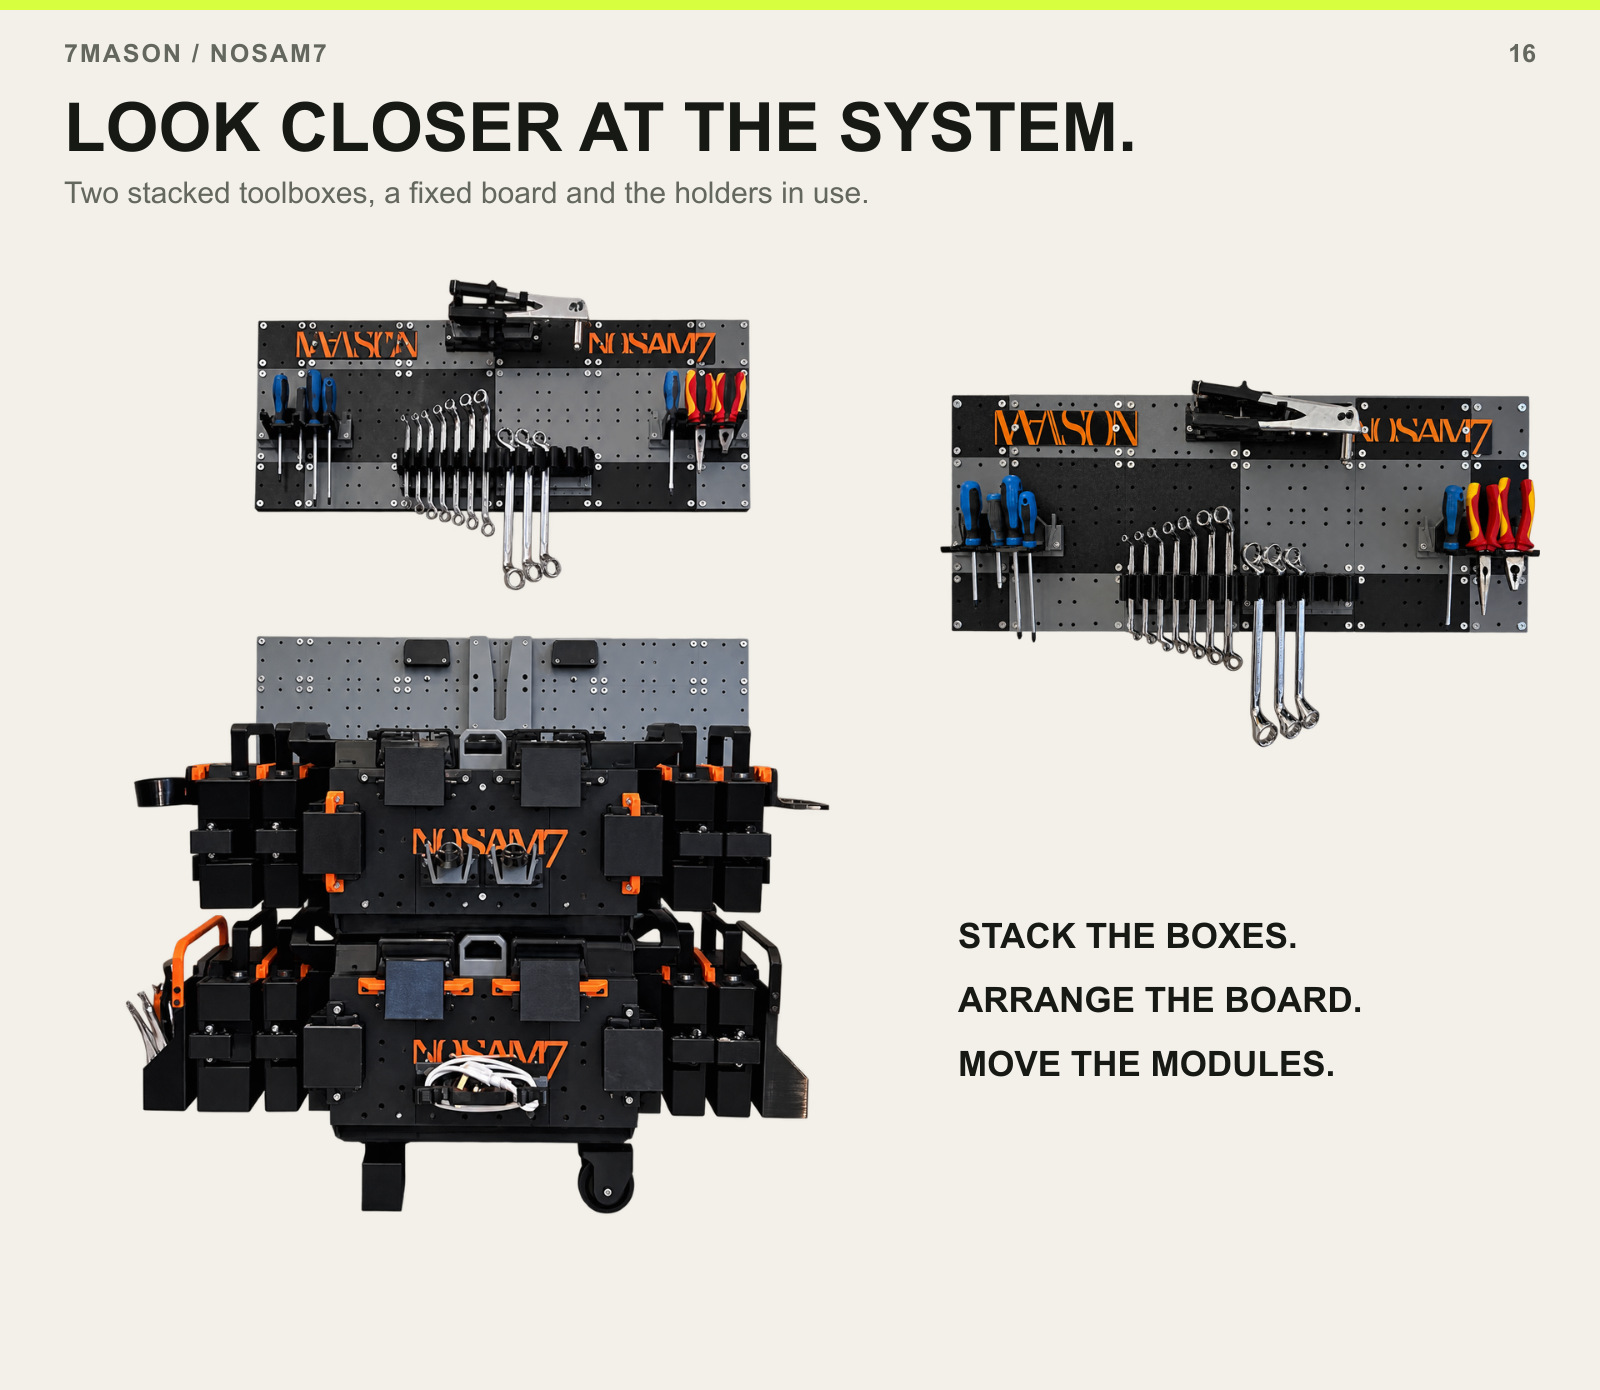
Complete loaded stacked system and a closer view of the loaded fixed pegboard.

The loaded fixed board and stacked toolboxes show how the holders and storage work together. Start with the modules you use, then print additional compatible parts as your layout changes.

12 / Choose your licence

PRINT FOR YOURSELF.OR PRINT TO SELL.

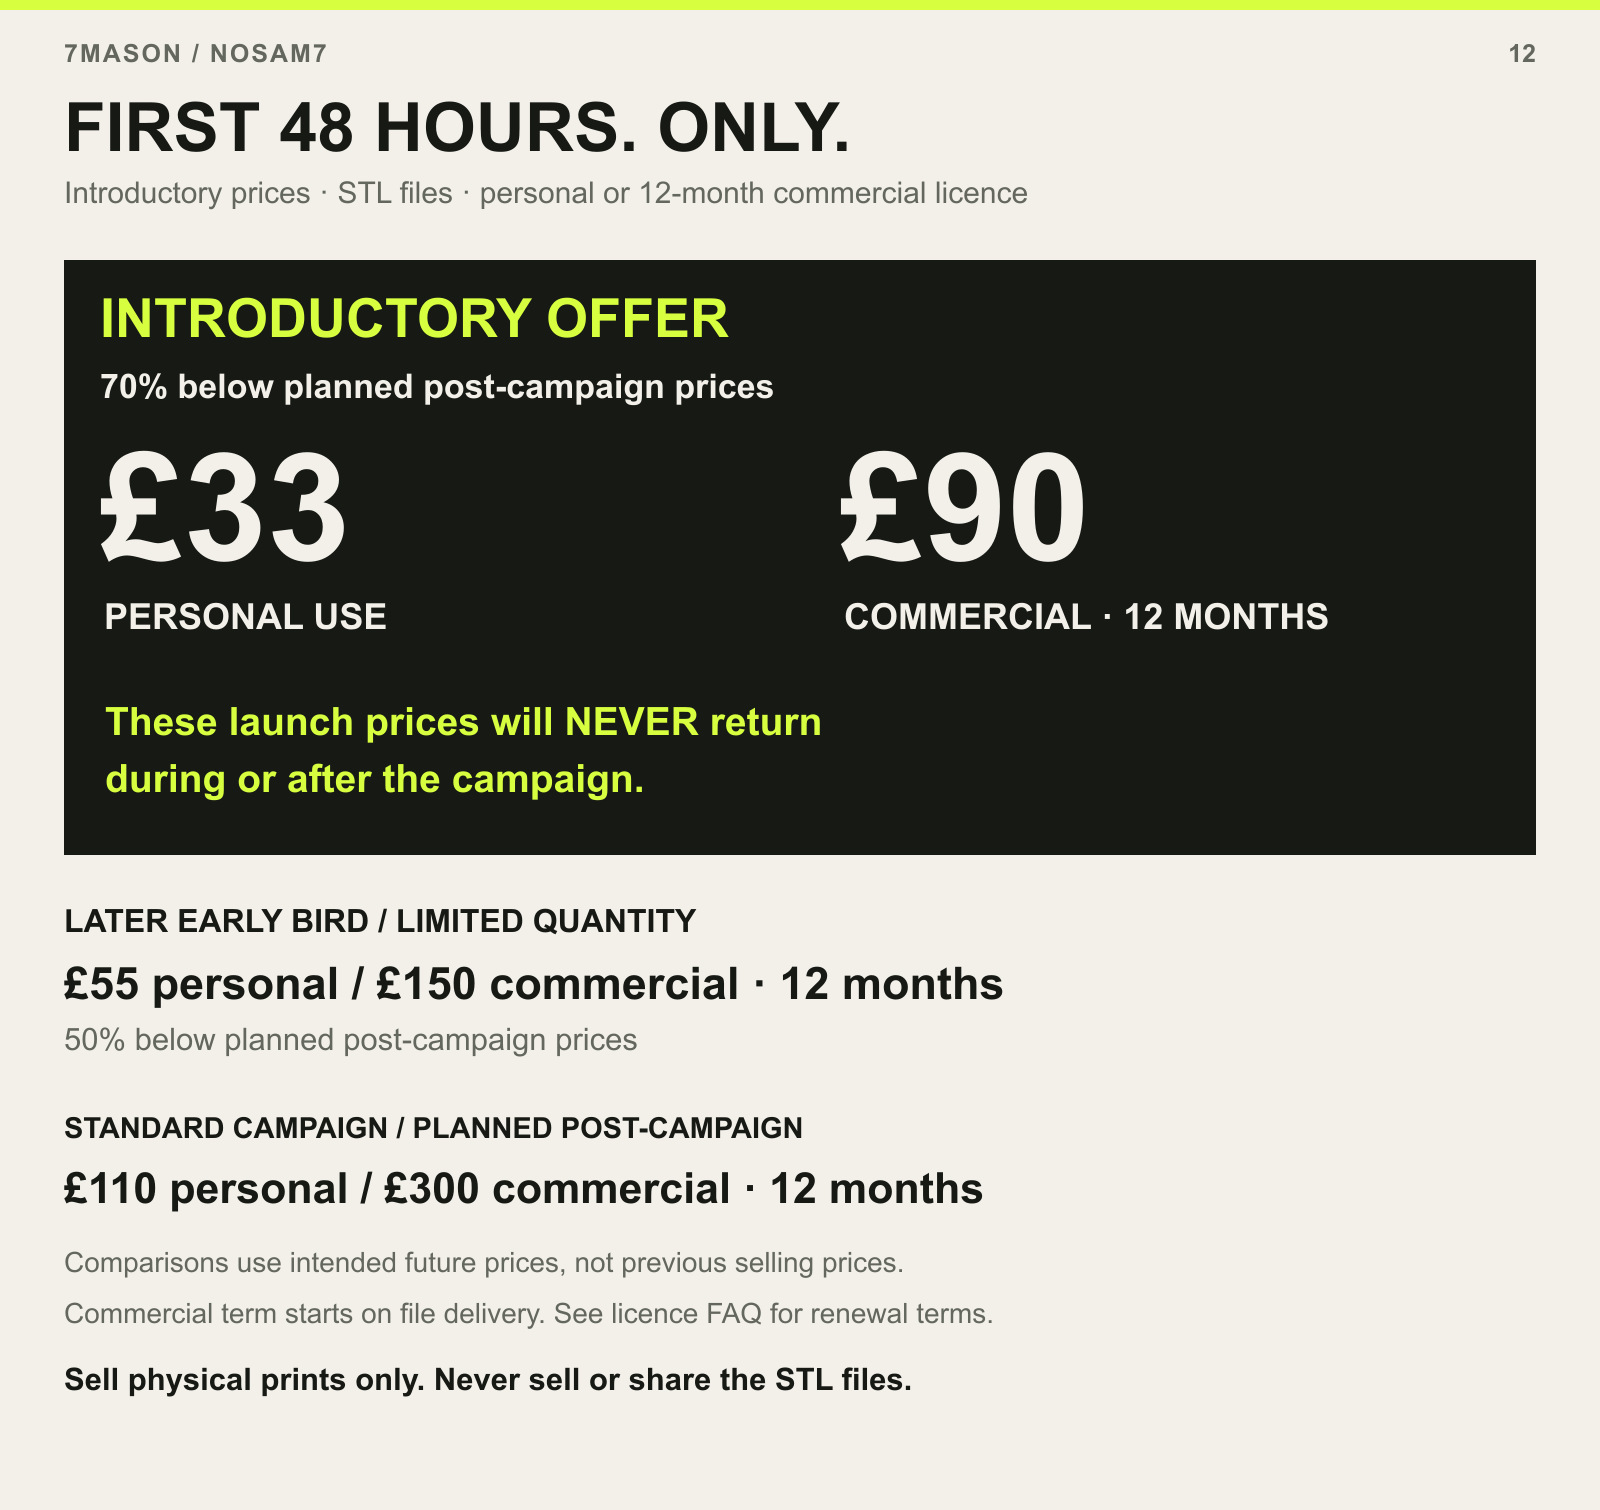
Introductory first-48-hours prices: £33 personal and £90 commercial for 12 months. Limited Early Bird: £55 and £150. Standard campaign and planned post-campaign: £110 and £300. Percentage comparisons are to planned future prices, not previous selling prices.

Both licences receive the same core STL collection. Personal use lets you print for your own use. The commercial licence lets you sell physical prints for one year from file delivery. Neither licence permits selling, sharing or redistributing the STL files.

FIRST 48 HOURS ONLY: introductory prices of £33 personal / £90 for a 12-month commercial licence. These are 70% below the planned post-campaign prices of £110 / £300, not previous selling prices. These launch prices will never be offered again, during or after this campaign.

After the first 48 hours, limited-quantity Early Bird rewards are £55 personal / £150 for a 12-month commercial licence, 50% below the planned post-campaign prices. Standard campaign rewards are £110 / £300 and remain available when Early Bird allocations are gone.

The commercial term starts when the files are delivered, not when you pledge. Renewal is required to continue selling after 12 months. It is not automatic; see the licence FAQ for terms.

One collection. Two licences. Three ways to join.
Reward windowPersonal useCommercial · 12 months
First 48 hours only Super Early Bird£33£90
Early Bird After 48 hours · limited quantity£55£150
Standard campaign Same core STL collection£110£300

Downloadable STL files only. Personal use is non-commercial. Commercial permission covers physical prints, never resale or redistribution of files.

Get notified on Kickstarter
7MASONEngineering / Making / 3D printing

The maker behind NOSAM7

I'm Mason.
Engineer and maker.

I have an MSc in Aerospace Engineering and a PhD in Nonlinear Mechanics. I’m a university educator and lifelong maker, and the designer behind 7MASON.

I have collaborated with engineering teams at companies including Rolls-Royce, and I teach finite element methods (FEM) at university.

I created NOSAM7 to bring my toolbox, pegboard and tool-storage designs together into one adaptable, home-printable system. I designed, printed and assembled the physical prototypes shown here, with a simple aim: to help other makers organise their tools around their space and the way they work.

NOSAM7 is the beginning of a wider family of functional printables designed to work hard, adapt and last.

Before you print

A few useful
answers.

Am I receiving a physical toolbox?

No. All rewards are digital STL files for you to 3D print. Tools, printers, filament, rods, fasteners and wall fixings are not included or shipped.

Which printer and material do I need?

Use PETG and a printer with a 250 × 250 mm bed. Check every part in its recommended orientation against your printer’s available Z height. All printed parts are designed to print without supports in that orientation. Any printers with the required build area should be suitable, but calibration, extrusion and material behaviour affect fit. Test the attachment fit before committing to a complete setup.

Are these editable CAD files?

The model reward format is STL. Native design files and STEP files are not included in the offer.

What additional hardware do I need?

For the illustrated setup, the only required bought-in assembly hardware is standard M6 nuts and bolts, three Ø4 mm metal bars for the hinge pins and one Ø10 mm metal bar for the wheel axle. These are ordinary off-the-shelf metal bars, cut to the assembly lengths. Most joints have captive nut pockets. Optional 1 mm-thick washers can be used where provided for. A wall-mounted installation also needs suitable fixings for your wall. The release will identify the fastener quantities and rod cut lengths for each configuration; additional boxes or repeated modules may require more hardware.

Are the latches and wheels printable too?

Yes. The toolbox panels, fixed pegboard, attachment parts, tool holders, trays, storage, toolbox and side-box latches, wheels and stand are printable in PETG. The latches are core closure mechanisms for the boxes, not separately purchased accessories. Apart from your printer and filament, the assembly uses the standard nuts, bolts and metal bars listed above. Wall fixings depend on the installation.

How large is the system?

The main toolbox is approximately 540 × 300 × 300 mm, width × depth × height, without attachments. The illustrated stacked arrangement is approximately 1000 × 350 × 900 mm. Overall dimensions depend on the configuration. Side-box depths are 30, 40 and 70 mm.

Are the stacking lock and wall mount the same mechanism?

No. StackLock joins one toolbox to another. WallDock connects the rear of a toolbox to its wall-mounted receiver. SnapDock is the separate shared interface for accessory modules.

What is the maximum load?

A rated carrying, stacking or wall-mounted load has not yet been established. Print quality, material, hardware, installation and load placement all affect performance. Do not treat prototype photographs as a load certification or a guarantee that tools will remain retained in every transport situation.

What does the personal licence allow?

It allows personal, non-commercial use of the supplied STL collection. You can keep using the delivered files for your personal printing. It does not allow selling prints or selling, sharing or redistributing the digital files. Any future ongoing commercial product-update programme is not included in the personal tier.

What does the commercial licence allow?

It allows you to sell physical 3D prints made from the licensed files for 12 months from file delivery. It does not allow selling, sharing or redistributing STL files. The commercial permission expires after that period; renewal is required to continue selling. Renewal is optional and is not automatic. The introductory campaign price covers the first year only.

Are ongoing commercial product updates guaranteed?

No. We hope to develop new compatible modules and improve existing designs as the community grows, subject to demand, available resources and testing. If an ongoing product-update programme is introduced, access will be for commercial licensees only while their licences remain valid. No funding or backer-count threshold, release frequency or lifetime updates are promised. Ordinary delivery and project communications are separate from these future development plans.

Can backers design compatible parts?

We aim to introduce a route for backers to submit their own original compatible modules for review, such as a holder for a particular drill or tool. This is a future plan, subject to resources, not a guaranteed campaign reward. If introduced, selected and tested contributions may be included in the core collection with permission. Submission would not guarantee acceptance or permit redistribution of NOSAM7’s existing STL files.

Will the first-48-hours price come back?

No. £33 personal and £90 one-year commercial are available ONLY during the first 48 hours after the campaign launches. These prices will not be offered again during or after the campaign. Later limited-quantity rewards are £55 / £150, followed by the standard campaign prices of £110 / £300.

What are the introductory price comparisons based on?

The first-48-hours prices of £33 personal / £90 commercial are 70% below the planned post-campaign prices of £110 / £300. Later limited Early Bird prices of £55 / £150 are 50% below those planned prices. These are introductory offers, not reductions from a previous selling price. Commercial prices cover 12 months of physical-print selling permission from file delivery; personal use is non-commercial. Standard campaign rewards are also available at £110 / £300.

Do I need to buy accessories as add-ons?

No. All pictured core NOSAM7 modules are included in every paid tier: the toolbox, fixed board, connectors, stacking and wall-mount parts, wheels and stand, racks, five trays, hooks, side boxes, pocket bins and closure latches. No separate paid add-ons are offered at launch. These are digital models; tools, filament and assembly hardware are not supplied.

When will the files arrive?

The target is within one month after the campaign ends. This period is for organising the release, checking the files and testing approved, unlocked stretch-goal designs. If a problem affects delivery, we will tell backers what happened and provide a revised plan.

Does each tier contain different models?

No. The personal and commercial rewards contain the same core campaign collection; the difference is the licence. Any approved and unlocked campaign stretch-goal file packs included in the campaign rewards go to both licence types. Any future ongoing product-update programme would be commercial-only while the licence is valid; it is not guaranteed by this pledge.

Risks, testing and delivery

NOSAM7 already exists as a set of printed, assembled prototypes, but preparing a dependable file release is still work. The remaining tasks include file organisation, assembly documentation, hardware lists and testing any approved, unlocked stretch-goal designs. These tasks may reveal changes that affect the schedule. Our target is delivery within one month after the campaign ends; if that changes, we will explain the issue and revised timing in a project update.

3D printing is variable. Printer calibration, PETG behaviour, orientation and print settings affect dimensional fit, clips, hinges and strength. Results may differ between machines, and some test printing may be necessary. Backers supply their own equipment and materials. No rated load has yet been established for the toolbox, stacking system or wall mount. Wall installations require appropriate fixings and a suitable mounting surface.

The initial campaign release and any explicitly included, unlocked stretch-goal files are distinct from future development. Further modules, refinements and a community submission route are ambitions, dependent on demand, available resources and testing, not guaranteed campaign rewards. No ongoing release schedule is promised. If an ongoing product-update programme is introduced, access will be limited to commercial licensees while their licences are valid. Community-designed contributions would require review, testing and permission before inclusion; not every submission would be accepted.

This is a digital-file project: there are no factory production or physical fulfilment promises. Digital delivery still depends on a working distribution process and accurate backer access records. We will test that process before the release and communicate through Kickstarter if there is a delivery issue.

Photography and AI-use disclosure

NOSAM7’s product designs and photographed physical prototypes were created by Mason / 7MASON. AI tools were used to assist with campaign copy and to produce background-cleaned versions of creator-supplied product photographs. Original camera photographs are shown for mechanical details. These edits are presentation work, not evidence of additional product features, load testing or performance.

Tools used: ChatGPT/Codex for copy and layout assistance, and the built-in OpenAI image editor for photographic background-cleanup candidates. No AI-generated CAD or STL design is claimed in this campaign kit.

NOSAM7Kickstarter pre-launch

Your next project.
Your whole workshop.

Follow NOSAM7 on Kickstarter and select “Notify me on launch”. The £33 personal and £90 one-year commercial launch prices are available for the first 48 hours only.